16 Brown Christmas Nails That Feel Like Hot Cocoa
Brown Christmas nails are the set I would pick over red this December, and I do not say that lightly. Red shouts; brown glows, the way candlelight sits on dark wood. These sixteen sets keep the colour warm, then add Christmas detail in gold and cream on every nail.
My own rotation leans deep first: espresso for evenings, milky mocha on short-nail weeks, tortoiseshell when I want questions.
Quick Picks
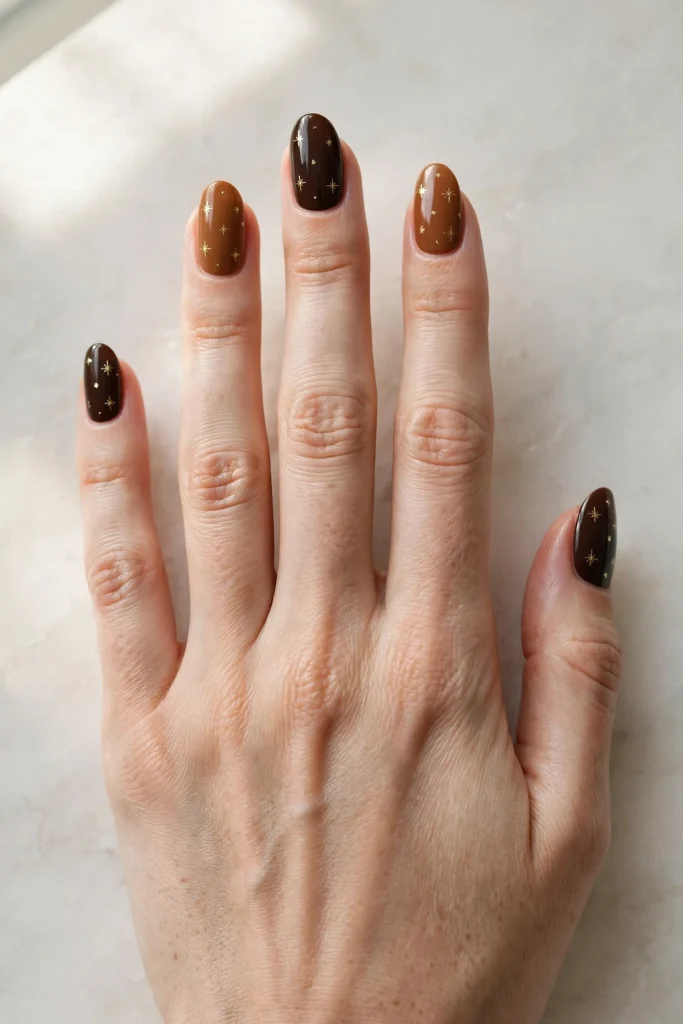
- The crowd favourite: idea 1, espresso gloss with gold micro stars, regular polish and pure shine.
- The warmest-looking set: idea 5, caramel swirls with gold dots on a toffee base.
- Short nails, sorted: idea 16, milky mocha with cream dot snowfall on short squovals.
- Worth the lamp: idea 3, tortoiseshell with gold star dust. Ideas 3, 6, 8, 11, 13 and 15 need a gel kit.
- Party shine: idea 12, bronze shimmer with cream snow dots, made for evening light.
Pick by finish as much as by shade: gloss reads dressy, matte reads cosy, and the jelly and glass sets sit somewhere in between.
1. Espresso Gloss Brown Christmas Nails With Gold Micro Stars
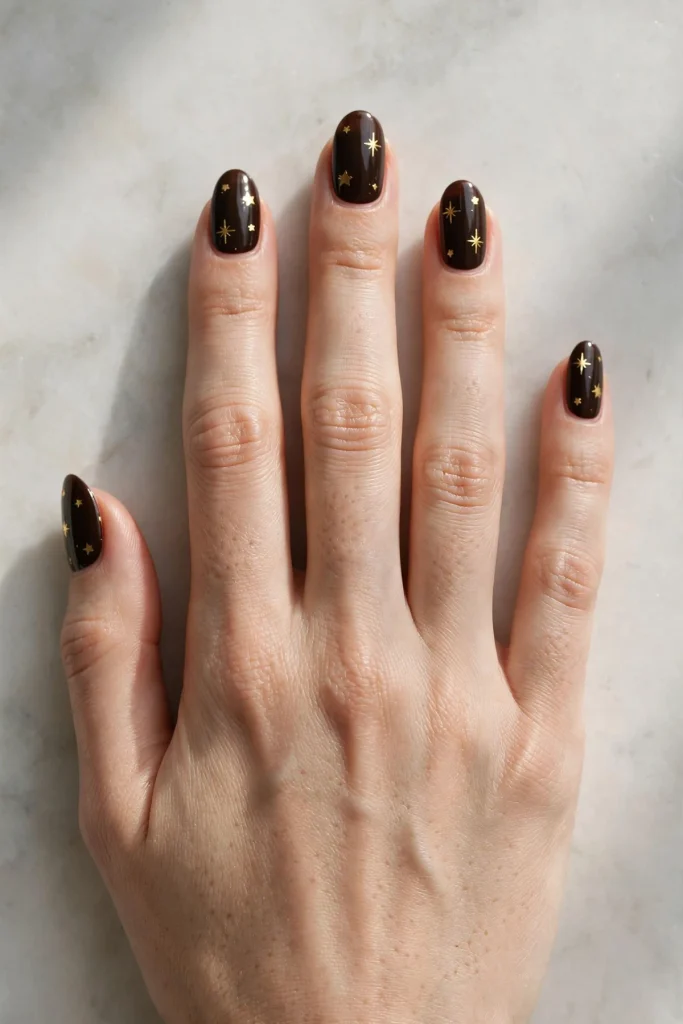
The deepest brown here: near-black indoors, warm in daylight, on mid-length almond nails with a mirror gloss. Tiny gold stars scatter over every nail, three to five each. Around fifty minutes in a salon, regular polish, high-gloss finish.
Base coat, then two thin coats of espresso, the first left tacky. Dot each star centre in metallic gold, then pull four tiny points out with a fine brush. Glossy top coat seals the lot.
- Shade note: espresso flatters deep and olive skin especially and warms up pale hands.
- Photo note: shoot near a window; the stars sparkle only when the gloss catches light.
2. Chestnut French Brown Christmas Nails With Cream Snow Dots

A soft French with a brown twist: milky nude base, chestnut-brown tips, and tiny cream dots following the smile line of every nail, like snow on a roof edge. Short squoval nails suit it well. Around forty minutes, regular polish, glossy finish.
Start with base coat and one sheer milky coat. Paint the chestnut tips freehand, or use guide strips for a clean curve. Add the cream dots with a dotting tool, then glossy top coat.
- Grow-out note: the nude base hides regrowth, handy in the busiest weeks.
- Edge note: wrap the chestnut over the free edge, where French tips chip first.
3. Tortoiseshell Brown Christmas Nails With Gold Star Dust
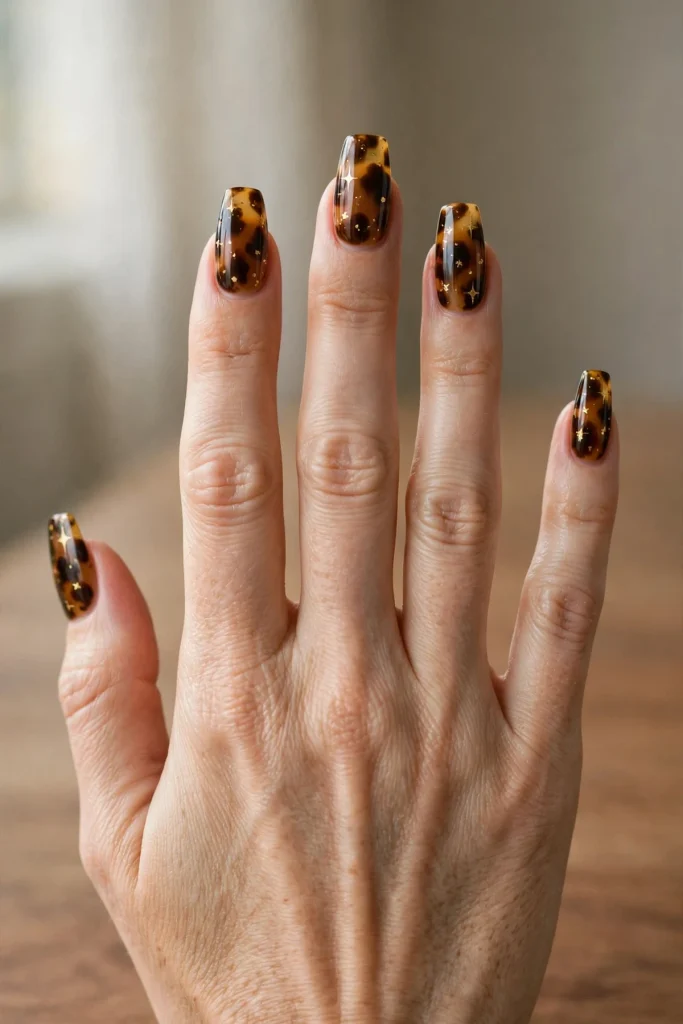
Tortoiseshell is the richest pattern here: translucent amber layered with caramel and dark brown blotches on mid-length coffin nails, gold star dust pressed near the tips. It needs a gel kit, because the depth comes from cured layers. Around seventy-five minutes, glossy gel finish.
Gel base coat, cure, then a sheer amber coat and cure again. Blot caramel and espresso gel blobs with a flat brush, let them settle briefly, and cure. Repeat once, place the gold stars, then glossy gel top coat and a final cure.
- Depth note: two thin blotched layers read richer than one thick one.
- Watch out: seal the free edge on every layer; tortoiseshell lifts there first.
4. Matte Cocoa Brown Christmas Nails With Glossy Tips
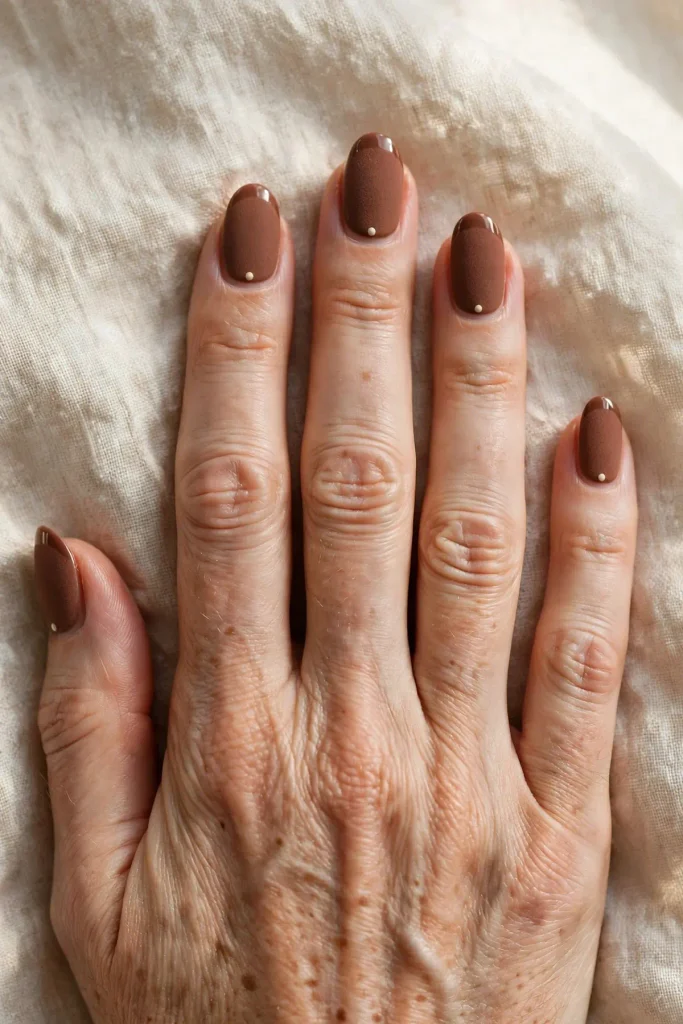
One shade, two finishes. Mid cocoa brown, matte and velvety across the nail, with a glossy stripe at the tip edge and one tiny cream dot at each cuticle. Mid-length oval nails carry it well. Around forty-five minutes, regular polish.
Two coats of cocoa over base coat, dried fully, then a matte top coat over everything. Once set, run glossy top coat along the tip edge only with the side of the brush, and add the cream dot.
- Texture note: matte shows every ridge, so a ridge-filling base coat earns its place here.
- Refresh note: matte dulls by week two; one fresh matte coat revives it.
5. Caramel Swirl Brown Christmas Nails With Gold Dots
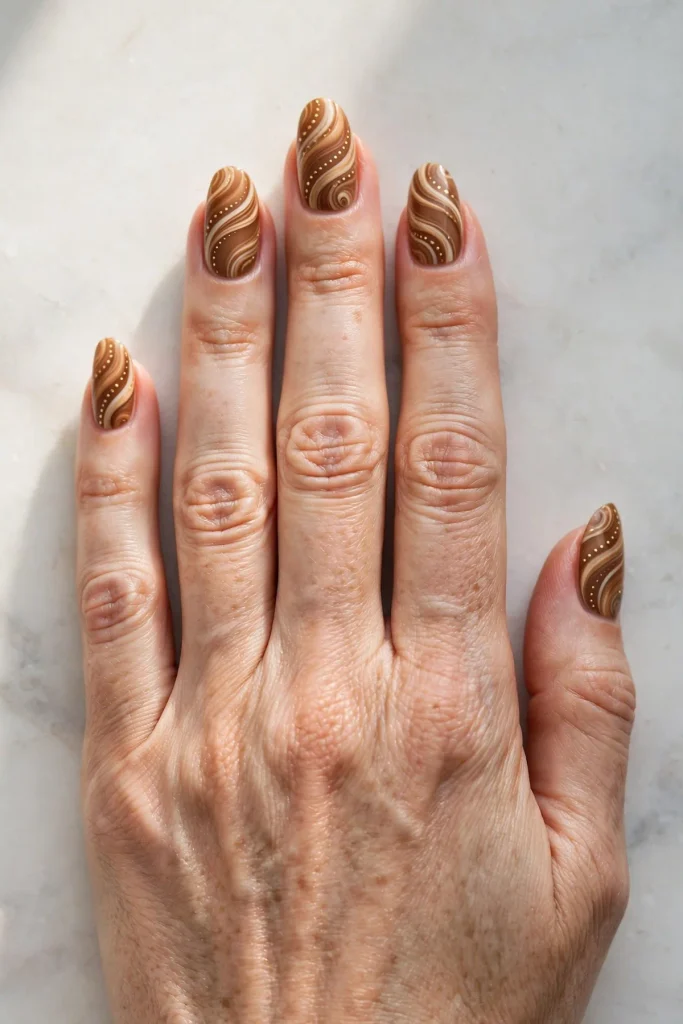
Toffee brown base, with ribbons of caramel and cream curling over it, like the swirled top of a stirred drink. Tiny gold dots trace the ribbons. Mid-length almond nails give the swirls room. Around fifty-five minutes, regular polish, glossy finish.
Brown is my pick when I want Christmas warmth without the full red commitment; it sits softer in photos and still reads festive once gold joins it.
On a dry base: two coats of toffee, then ribbons with a liner brush, caramel first, cream beside it. Drag a pin through the wet lines, dot gold along them, and seal with gloss.
- Steady-hand note: rest your painting hand on the table edge; ribbons forgive wobbles and look better with them.
- Pairing note: the gold dots echo gold jewellery in party photos without any glitter fallout.
6. Amber Glass Brown Christmas Nails With Gold Snow Dots
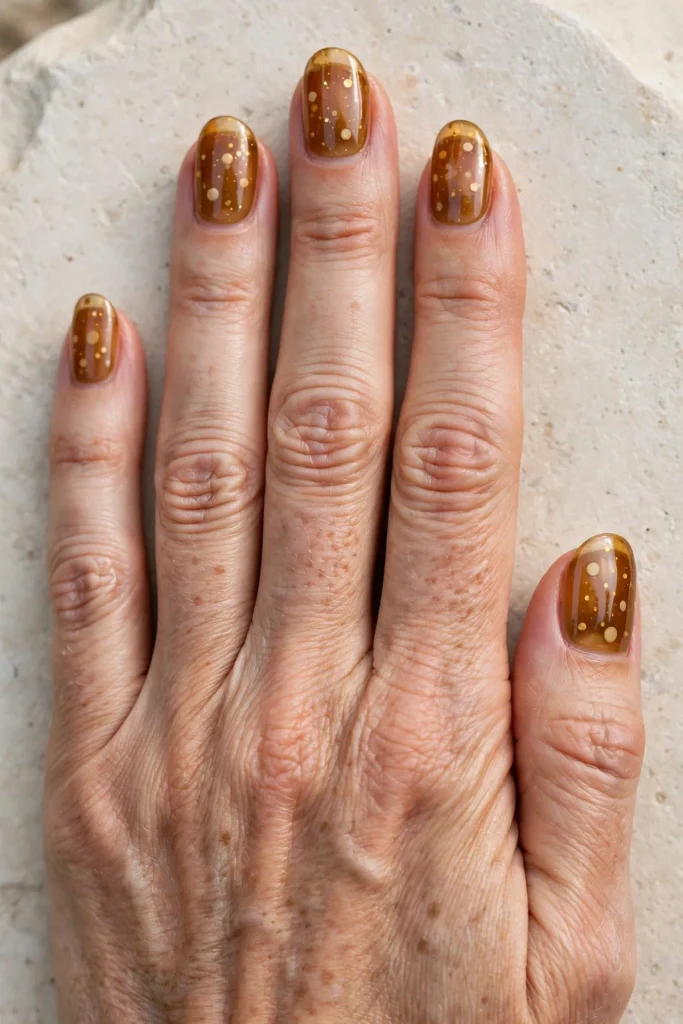
The sheer one: amber jelly polish stays translucent, so light passes through, and tiny gold and cream dots float inside the layers like snow in glass. Mid-length oval nails show the glow well. It needs a gel kit, with the dots cured between jelly layers. Around seventy minutes.
Cure a gel base coat first. Lay one sheer amber jelly coat and cure. Place the gold and cream dots with a dotting tool, then float a second jelly coat over them and cure again. Glossy gel top coat and a last cure give the glass finish.
- Light note: jelly shades glow on deep skin and keep pale hands warm rather than stark.
- Watch out: the nail line shows through jelly; a milky base coat softens it.
7. Toffee Gradient Brown Christmas Nails With Gold Micro Stars
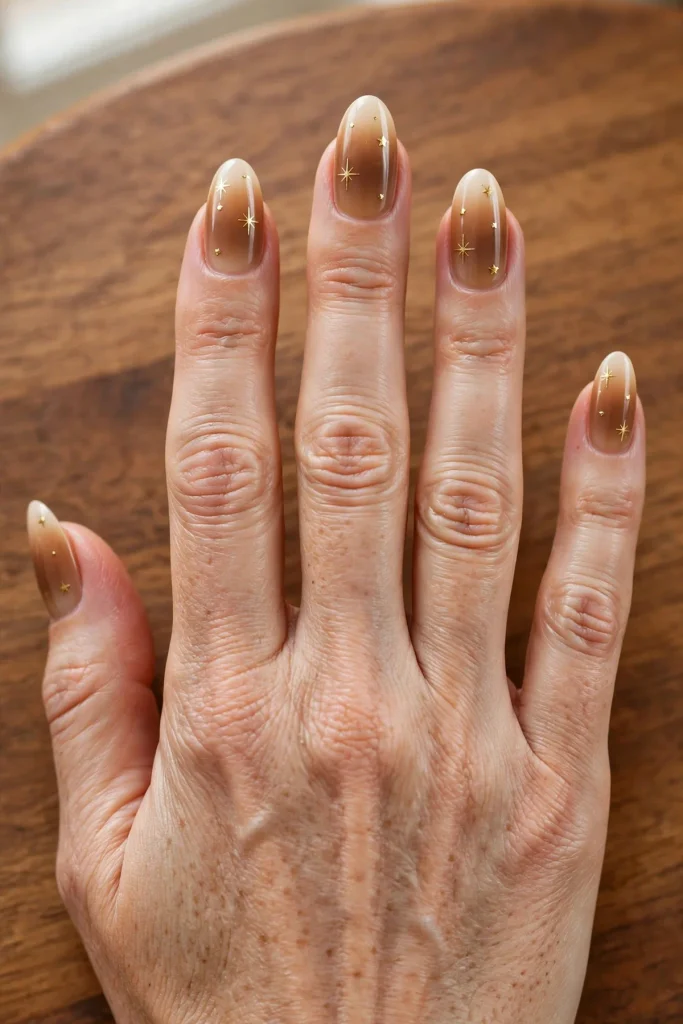
A soft fade from toffee at the base to warm cream tips, gold micro stars scattered over the darker half of every nail. Mid-length almond nails stretch the gradient nicely. Around fifty minutes, regular polish, glossy finish, sponged on.
Base coat, then a full coat of the cream as your canvas. Stripe toffee and cream side by side on a small sponge, dab it on paper once, then press and rock it over each nail twice, cleaning the skin as you go. Add the stars with a dotting tool and fine brush, then gloss.
- Blend note: a dry sponge drags; keep it loaded but not dripping, and the fade stays smooth.
- Shade note: choose a warm cream, because a blue-toned white turns the middle of the fade grey.
8. Chocolate Marble Brown Christmas Nails With Gold Veins
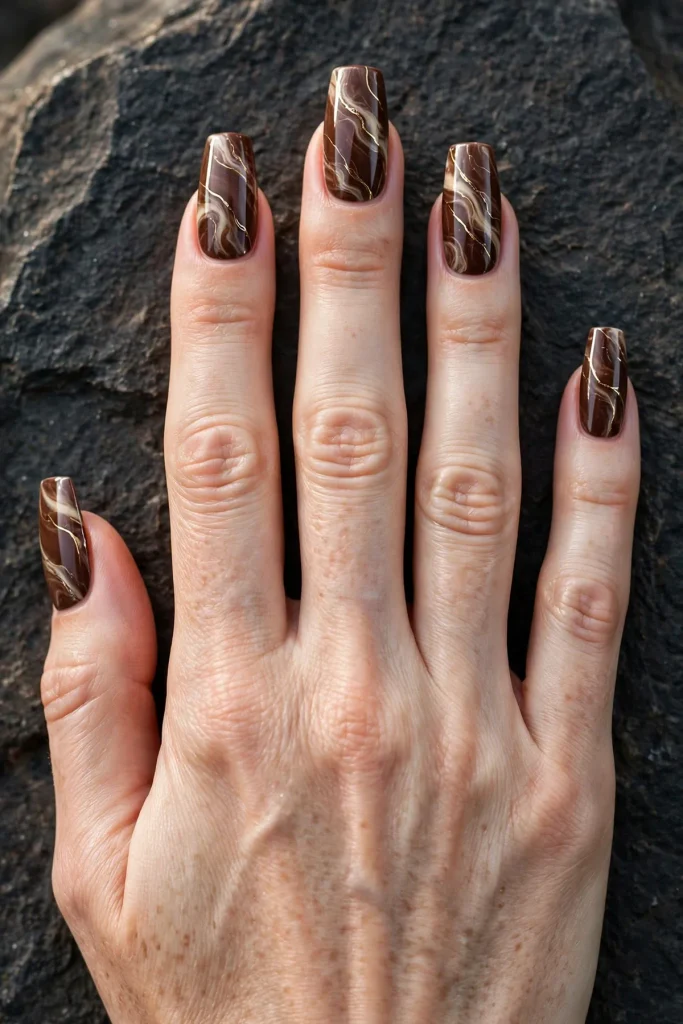
Deep chocolate marble with cream veins and thin metallic gold lines, glossy on mid-length coffin nails. No two nails match, and that is the point. It needs a gel kit and blooming gel so the veins spread softly. Around seventy-five minutes.
Cure the gel base, then a chocolate coat, cured. Add uncured blooming gel, drag cream and dark brown lines through it with a liner brush, and watch them bloom. Paint the thin gold veins last, cure, and finish with glossy gel top coat.
- Vein note: fewer veins read richer; two or three per nail is plenty.
- Watch out: blooming gel spreads faster on warm hands, so paint and cure one nail at a time.
Halfway reminder: brown shades deepen as they dry, so judge your colour after the top coat goes on, not in the bottle.
9. Walnut Woodgrain Brown Christmas Nails With Cream Fir Lines
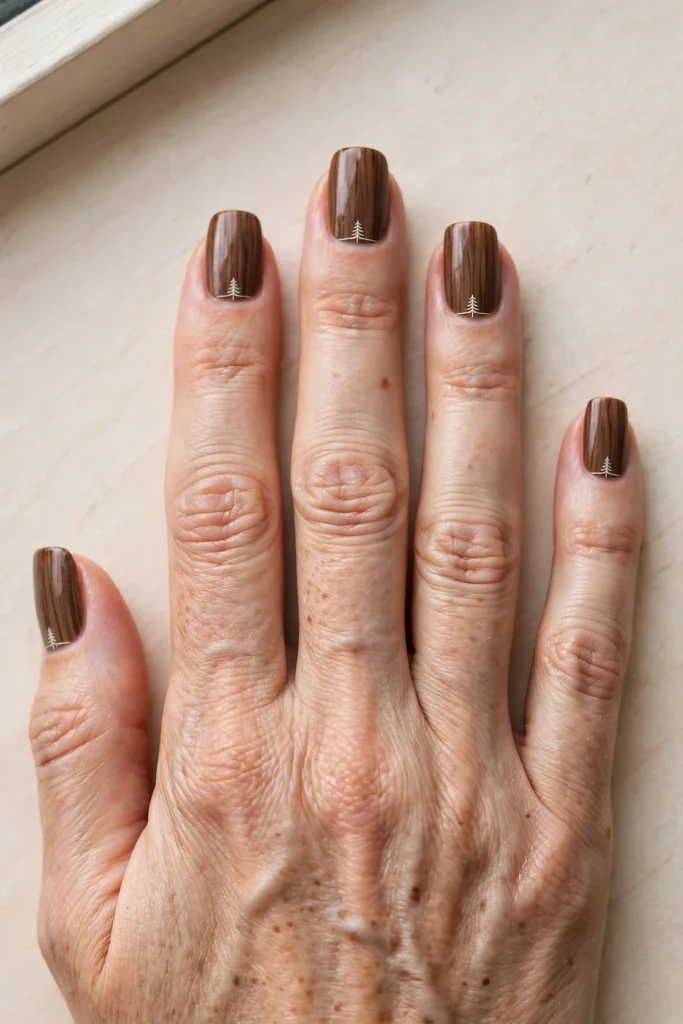
Walnut brown carries fine darker streaks along every nail, the way grain runs through polished wood, with one tiny cream fir tree in three strokes at each base. Mid-length square nails show the straight grain well. Around fifty-five minutes, regular polish.
Paint two coats of walnut over base coat. With a fine liner brush and espresso polish, pull long, slightly uneven streaks from cuticle to tip. For the fir, add one short vertical cream line and two angled strokes. Glossy top coat evens it out.
- Line note: woodgrain looks right imperfect; ruler-straight lines read as stripes.
- Shape note: square edges frame the grain lines better than pointed shapes.
10. Cinnamon Speckle Brown Christmas Nails With Cream Stars
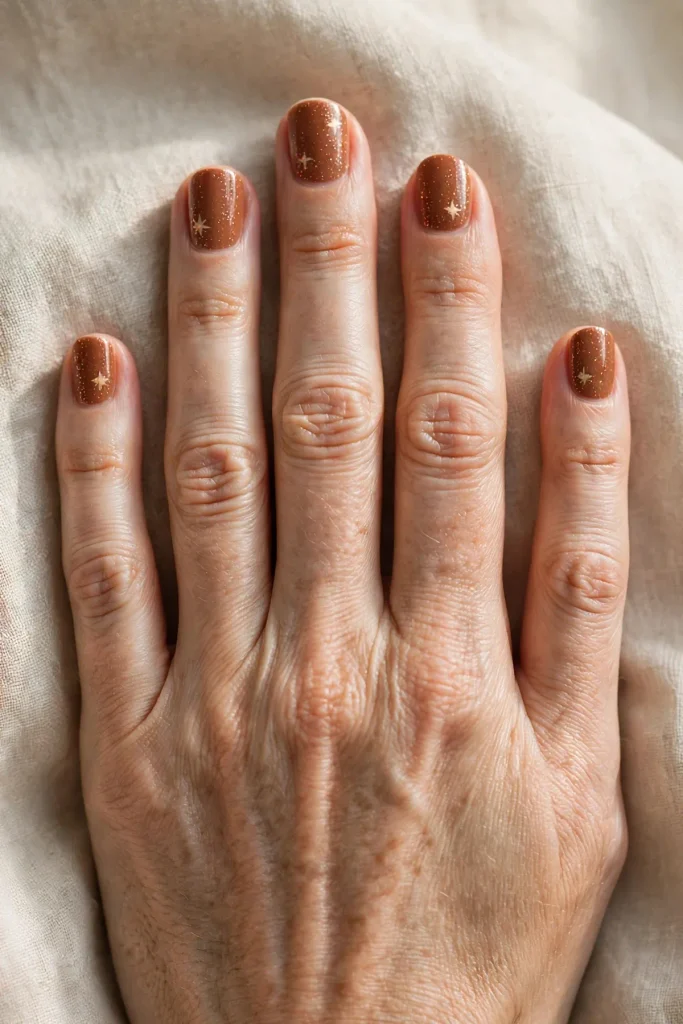
A warm mid brown filled with fine copper-gold speckle, like spice dusted through polish, with tiny cream stars over every nail. Short round nails suit this one; the detail is fine enough not to crowd them. Around thirty-five minutes, regular polish.
Two coats of the cinnamon brown over base coat, then one coat of a fine glitter topper, brushed slowly so the speckle spreads evenly. Paint the cream stars small, one or two per nail, then finish with glossy top coat.
- Short-nail note: fine speckle flatters short nails; the pattern scales down with the nail.
- Removal note: a peel-friendly base coat under the glitter helps the speckle lift away later.
11. Coffee Cream Ombré Brown Christmas Nails With Gold Star Tips

The dressed-up gradient: deep coffee at the cuticle melting into cream tips with no hard line, gold micro stars clustered near the tips. Long almond nails show the melt well. It needs a gel kit, since gel blends before it cures. Around eighty minutes.
Cure the gel base. Lay coffee gel over the cuticle third and cream at the tip, feather the middle with a flat ombré brush, and cure. Repeat once, add the stars in gel paint, cure, and seal with glossy gel top coat.
- Length note: the fade stretches shorter nails visually, so mid lengths wear it too.
- Watch out: pressing drags dark polish into the cream; feather the brush instead.
12. Bronze Shimmer Brown Christmas Nails With Cream Snow Dots

Metallic bronze with a soft shimmer, and on every nail a small cluster of cream snow dots near one corner, like the first flakes landing. Mid-length squoval nails keep it neat. Around forty-five minutes, regular polish, glossy finish.
Bronze is my middle ground for party season: warmer than silver, softer than loose glitter, and it glows against deep skin and pale skin alike once the evening light hits it.
Two thin coats of bronze over base coat, fully dried between coats so the shimmer stays smooth. Dot the cream clusters with a dotting tool, three dots close together, then glossy top coat.
- Shimmer note: metallic polish shows strokes, so finish each nail with one long stroke down the centre.
- Evening note: bronze wakes up under warm indoor light, right where December evenings happen.
13. Mahogany Velvet Brown Christmas Nails With Gold Bow Lines
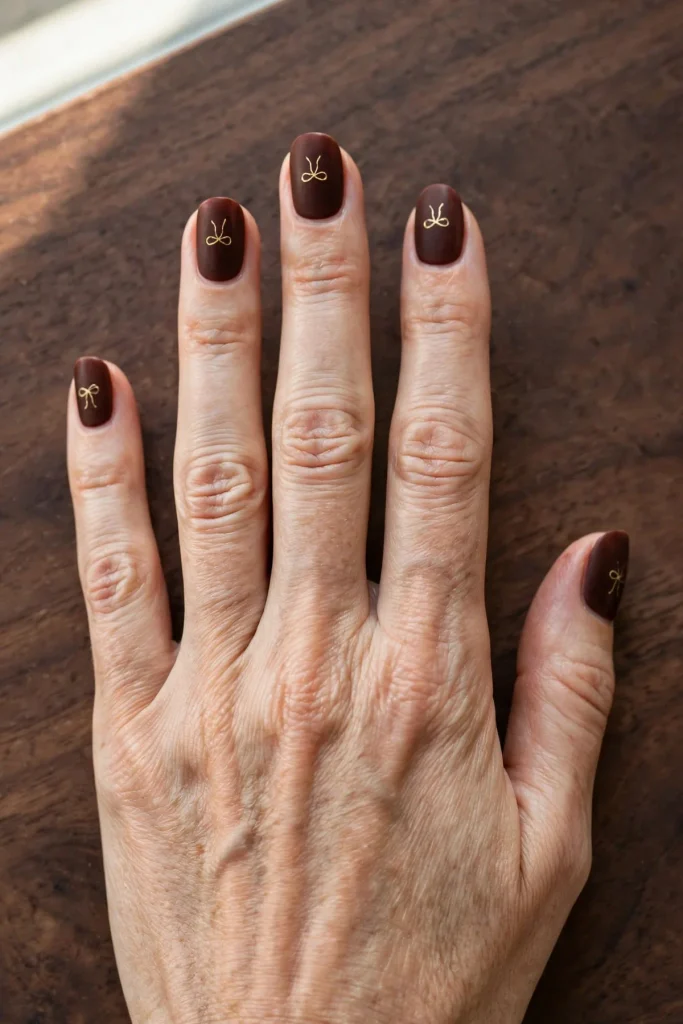
Deep mahogany under a velvet matte top coat, with one tiny gold bow in fine lines on every nail, glossy against the matte. Mid-length oval nails suit the softness. It needs a gel kit. Around seventy minutes, matte gel finish.
Cure the gel base, then two coats of mahogany gel, curing each. Add the matte gel top coat and cure. Paint the bows on top with gold gel paint and a fine liner brush, small and centred, then cure the art.
- Finish note: glossy bows catch light first, so the detail shows even in dim rooms.
- Watch out: matte gel picks up oils from skin creams; wipe with a lint-free pad before photos.
14. Deep Cocoa Brown Christmas Nails With Bronze French Tips

A dark, dressy French: near-black cocoa gloss, metallic bronze along the tips, one tiny gold star at the corner of every tip. Mid-length almond nails carry the contrast well. Around fifty minutes, regular polish, high-gloss finish.
Two coats of deep cocoa over base coat first. Paint the bronze tips freehand along your smile line, let them dry, then add the gold star at one corner of each tip. Glossy top coat ties the metals together.
- Contrast note: bronze on near-black brown reads like jewellery, keeping the set grown-up.
- Swap idea: silver tips work in the same layout, but bronze keeps the whole set warm.
15. Clear Glass Brown Christmas Nails With Sealed Gold Stars

Mocha brown with small gold stars floating under a clear domed layer, suspended in glass rather than printed on top. Mid-length coffin nails show the depth well. It needs a gel kit, because the clear layer is builder gel. Around eighty minutes, high-gloss finish.
Cure the gel base and a mocha coat. Place the gold stars flat and flash-cure. Float clear builder gel over the top so it domes slightly, cure fully, then glossy gel top coat.
- Depth note: the clear layer suspends the stars; the effect shows most from a side angle.
- Salon note: ask for stars kept flat; raised edges can catch on knitwear cuffs.
16. Milky Mocha Brown Christmas Nails With Cream Dot Snowfall
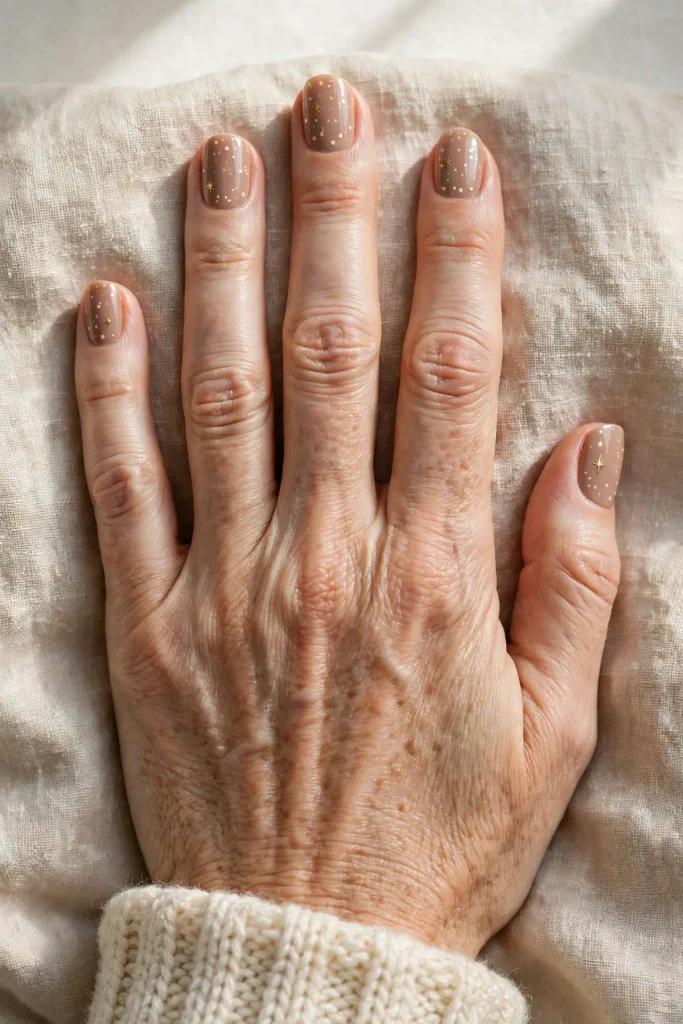
The gentle closer: milky mocha with tiny cream dots scattered unevenly over every nail like falling snow, plus one small gold star on each. Short squovals suit it, and it is the friendliest set here for home painting. Around thirty-five minutes, regular polish.
Two coats of milky mocha over base coat. Scatter the cream dots with a dotting tool, changing the spacing on every nail so it reads as snowfall, not a pattern. Add one gold star per nail with a liner brush and finish with glossy top coat.
- First-timer note: dots forgive everything; uneven spacing still reads as snow, so it suits a first try.
- Grow-out note: the soft shade hides regrowth well, giving the set an easy second week.
Brown Is the New Red: Shades That Read Christmas
Red reads Christmas because we are trained to see it that way. Brown reads Christmas for a quieter reason: it is the colour of the wooden table, the cocoa mug and the spice jars, so the brain files it under December on its own. The trick is the detail: plain brown is just brown, but gold or cream on top turns the set festive in a way photos love.
Work up the shade ladder. Milky mocha and toffee sit soft and daytime-friendly. Caramel, walnut and cinnamon hold the middle, warm enough for parties. Espresso, cocoa and mahogany go deep and dressy for evenings. Hold the bottle against your hand before you commit; that is the honest test of any shade.
How to Brief Your Nail Tech for a Brown Set
Show the depth, not just the shade. Brown changes completely between jelly, gloss and marble, so bring a photo of the finish you mean and say it out loud. Name your shape before the polish starts.
Say early whether you want regular polish or gel, since six sets here (ideas 3, 6, 8, 11, 13 and 15) need a gel kit and lamp time. If stars are in your set, agree their size too: micro reads elegant, bigger reads playful.
Keeping a Brown Set Fresh Through December
Dark browns can stain the natural nail, so a base coat is not optional under the deep shades. Keep cuticle oil handy, since brown shows dry cuticles more than pale shades do, and wear gloves for washing up.
For gel sets, do a patch test before your first full gel appointment if your skin reacts easily, and flag any lifting early. Do not peel gel off when it lifts; peeling takes layers of your own nail with it. Book professional removal instead, and skip the long soaking tricks shared online; forced removal weakens nails, not the gel itself. Regular polish sets are simpler: a fresh top coat around day five and the colour looks newly done.
Brown Christmas Nails Questions
Do brown nails actually look Christmassy? Yes, once the detail joins in: gold stars, cream snow dots and warm metallic tips turn a brown base into a Christmas set, on all five nails.
Which brown shade suits my skin tone? Warm, golden-leaning browns often suit olive and deep skin, while cooler, grey-leaning browns often suit fair and rosy skin. Mid shades like caramel and walnut are the safest place to start.
Which of these sets need a gel kit? Ideas 3, 6, 8, 11, 13 and 15 need gel polish, a lamp and curing between layers. The other ten are regular polish with a dotting tool and a fine brush.
Can I take gel nails off at home? Book professional removal where you can, and do not peel lifting gel, because it pulls layers of natural nail away with it. If a corner lifts before your appointment, file it smooth and leave the rest alone.
Which nail shape suits brown shades? Almond and oval soften deep browns and suit most hands. Square edges show off straight-line patterns like woodgrain and marble, and short squovals carry the French sets.
Brown does December quietly and still gets noticed. Choose your depth, mocha, caramel or espresso, add the gold or cream detail, and it will sit happily with everything from the office party to Christmas morning.