17 Grinch Christmas Nails That Steal the Show
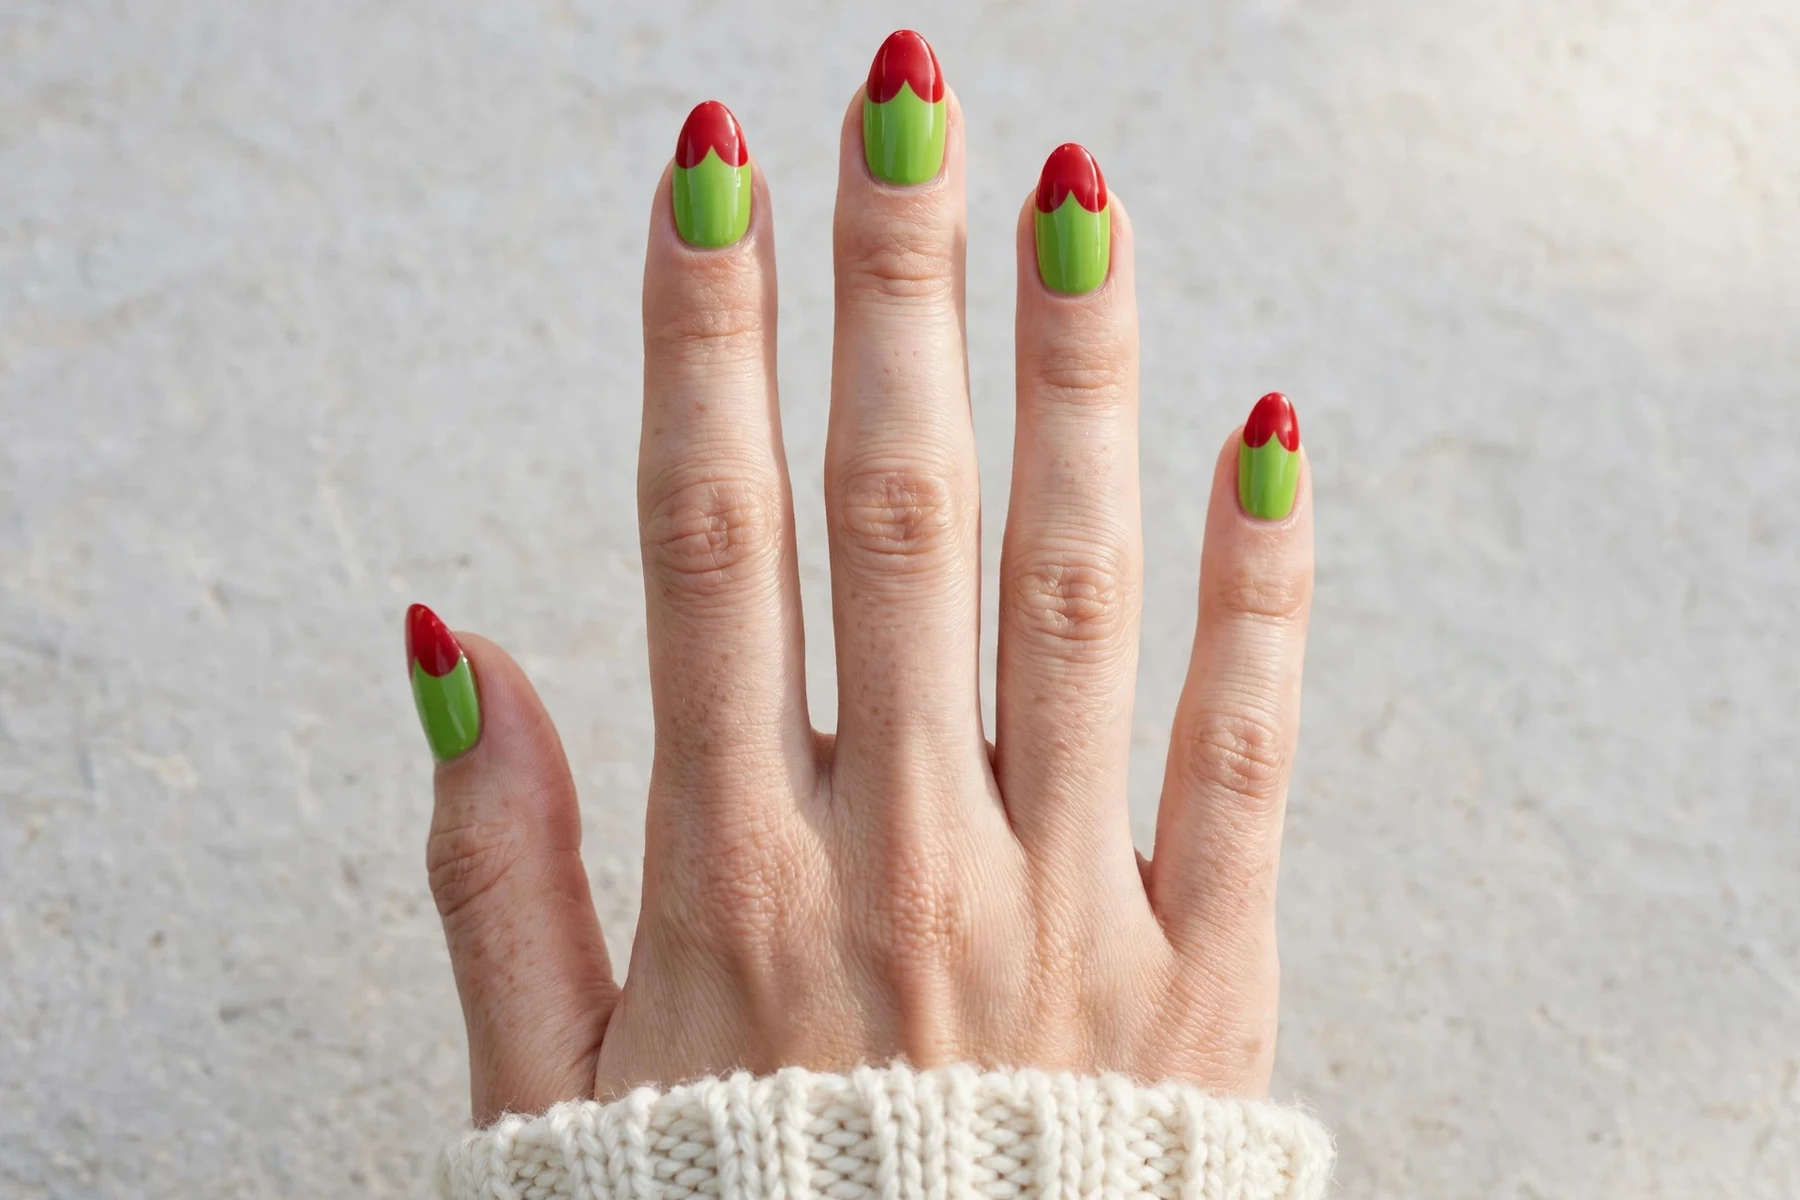
The mistake I see with Grinch nails every December is playing them too safe: one lime accent nail, four plain ones, and the whole joke falls flat. Grinch green only works when it commits. Every set below puts lime and red art on all five nails, so the colour reads across the room.
My own taste runs loud here. I reach for the brightest lime first and save the deep green sets for evenings; if I could keep only one set, it would be the heart tips in idea 1.
Quick Picks
- The crowd favourite: idea 1, red heart tips on a lime base.
- Easiest set to paint at home: idea 16, red tips with a tiny lime heart.
- Short nails, no problem: idea 12, deep green with glossy lime tips.
- Worth switching the lamp on for: idea 17, lime stilettos with red crystal clusters.
- The grown-up green: idea 7, a soft lime aura with a red glow at the centre.
Pick by your week and your diary, not just the photo. The detailed sets earn their salon time; the simpler ones leave room for wrapping, baking and everything else December throws at you.
1. Lime Green Grinch Christmas Nails With Red Heart Tips
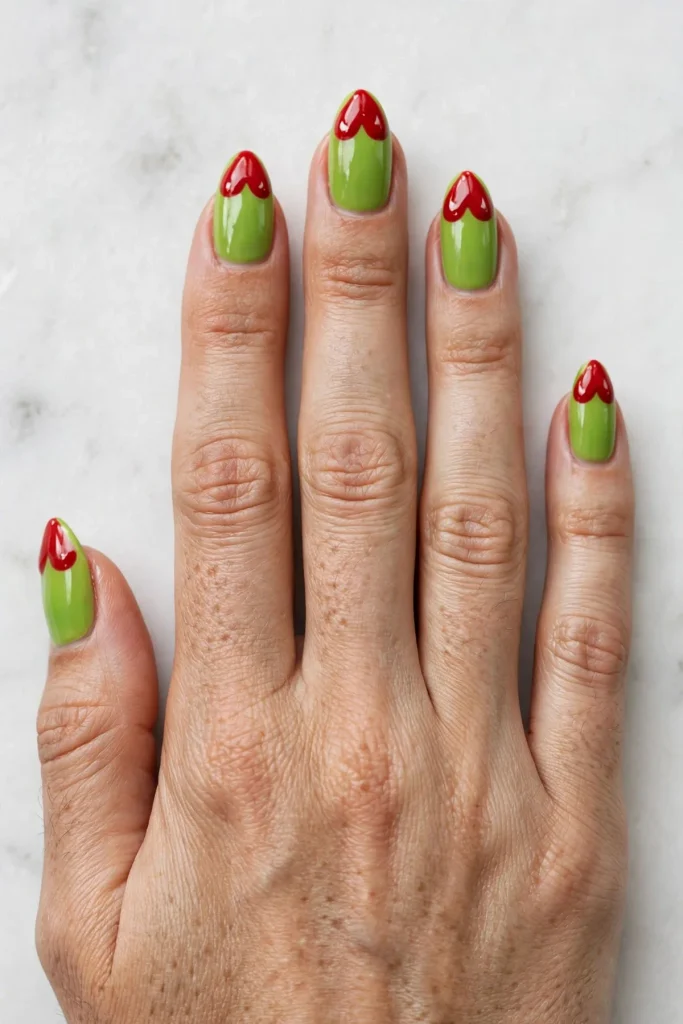
This set carries the whole theme: a glossy lime base on every nail, each tip a red heart of two round lobes meeting in a soft point facing the cuticle. It suits mid-length almond nails, takes about an hour in a salon, and needs high gloss, because matte red hearts read flat.
Paint it like this: base coat, two thin coats of lime, then the hearts. Stamp two red dots side by side at the tip with a dotting tool and drag a fine brush down between them to pull the point, dead centre on every nail. Seal with glossy top coat.
2. Lime Jelly Grinch Christmas Nails With Red Glitter Inside
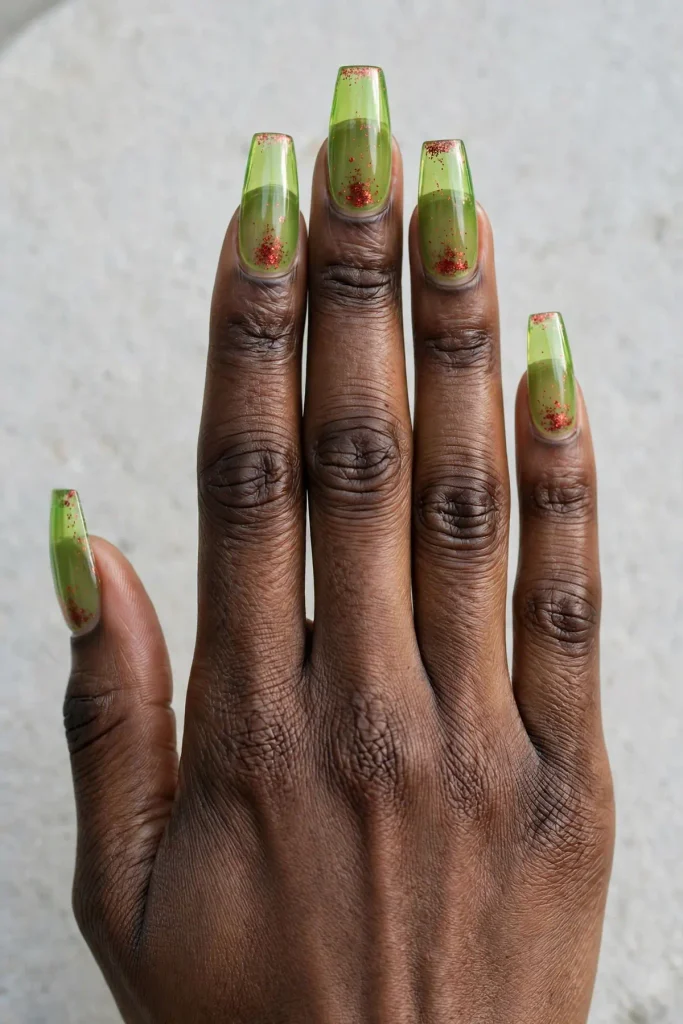
Jelly nails are the quiet trick here: a translucent lime base, sheer enough for light to pass through, with fine red glitter sealed inside each nail near the tip, suspended in the gel instead of sprinkled on top. It suits a mid-length coffin, needs gel kit work in cured layers, and takes about seventy-five minutes in a salon.
The build goes in layers: base gel, cure, one sheer lime jelly coat, cure again. Press red glitter near the tips with a flat brush, sandwich it under a second jelly coat, cure, then glossy gel top coat and a final cure. Sealed inside, the glitter lasts.
3. Crooked Stripe Grinch Christmas Nails in Lime and Red

Straight stripes are too well behaved for this theme. A deep green base carries thick hand-painted stripes in lime, red and white, deliberately uneven, each nail wobbling its own way like ribbon on a badly wrapped present. Mid-length square nails keep them bold; regular polish handles it in about fifty minutes.
Work freehand and do not correct yourself: base coat, two coats of deep green, then stripes with the flat side of the brush, lime, red, then white, every stripe a different width and wobble. Glossy top coat.
4. Red Grinch Christmas Nails With a Lime Squiggle Line

Red leads this time. A glossy true-red base covers every nail, and one thin lime line travels across each in a loose squiggle, entering at one side and leaving at the other. Side by side, the nails look like one doodle wandering across the hand. Kind to short-to-mid-length almond nails; about forty-five minutes.
To copy it: base coat, two coats of red, then load a long striping brush with lime and pull one loose S-curve across each nail in a single stroke. Reload between nails, and rest your painting hand flat first. Top coat to seal.
5. Lime Crackle Grinch Christmas Nails Over a Red Base

Crackle polish does the artwork for you. A full red base goes on every nail, then lime crackle shatters over it as it dries, breaking into a crooked web with red showing through every crack; no two nails split alike. Friendly to short squoval nails, regular polish only, about thirty minutes at home plus drying.
Order matters: base coat, two coats of red, dried completely, because crackle will not split over wet colour. Then one thin coat of lime crackle and watch it shatter. Thick coats split into dull chunks and hide the red. Glossy top coat once the web settles.
6. Matte Lime Grinch Christmas Nails With Wonky Red Shapes
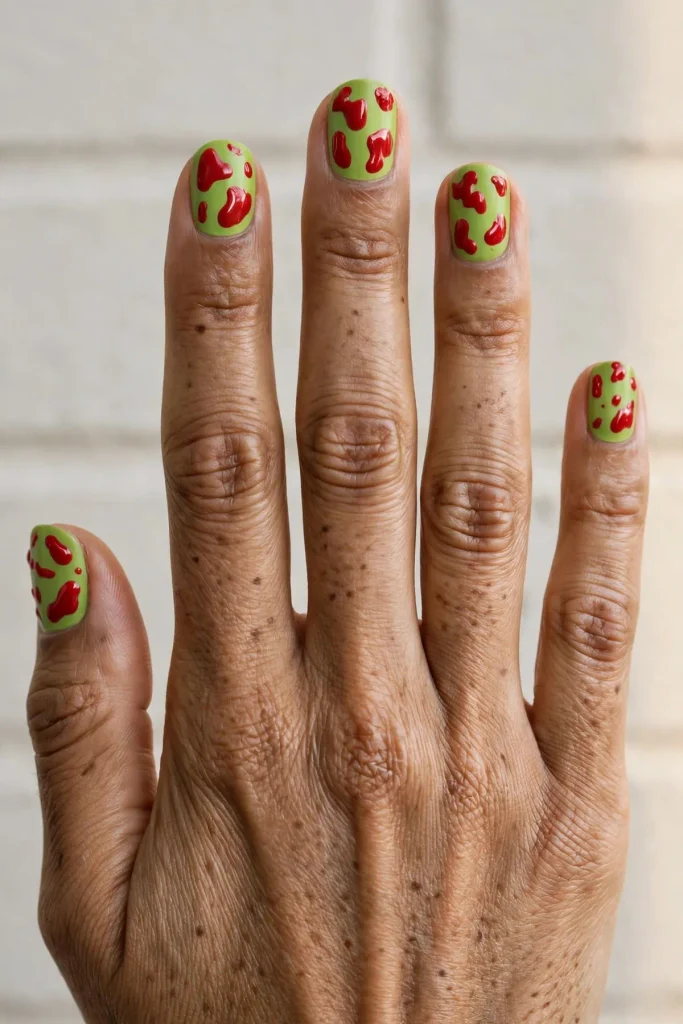
This set looks like shapes cut from red paper and scattered over lime: a flat matte lime base, with glossy red blobs and ovals over it, each a different size and tilt, none perfectly round. Matte against gloss is the whole point. It flatters short round and squoval nails, regular polish only, about forty minutes.
Matte lime is the shade I point to when someone tells me green cannot look soft. It can. It just needs the shine kept on the red.
Keep it loose: base coat, two coats of lime, a matte top coat. Once dry, blob the red on with the fat end of a dotting tool, biggest shape first near the middle, smaller ones in the gaps, and leave the red glossy. A kind first try at this pairing.
7. Lime Aura Grinch Christmas Nails With a Red Glow Centre
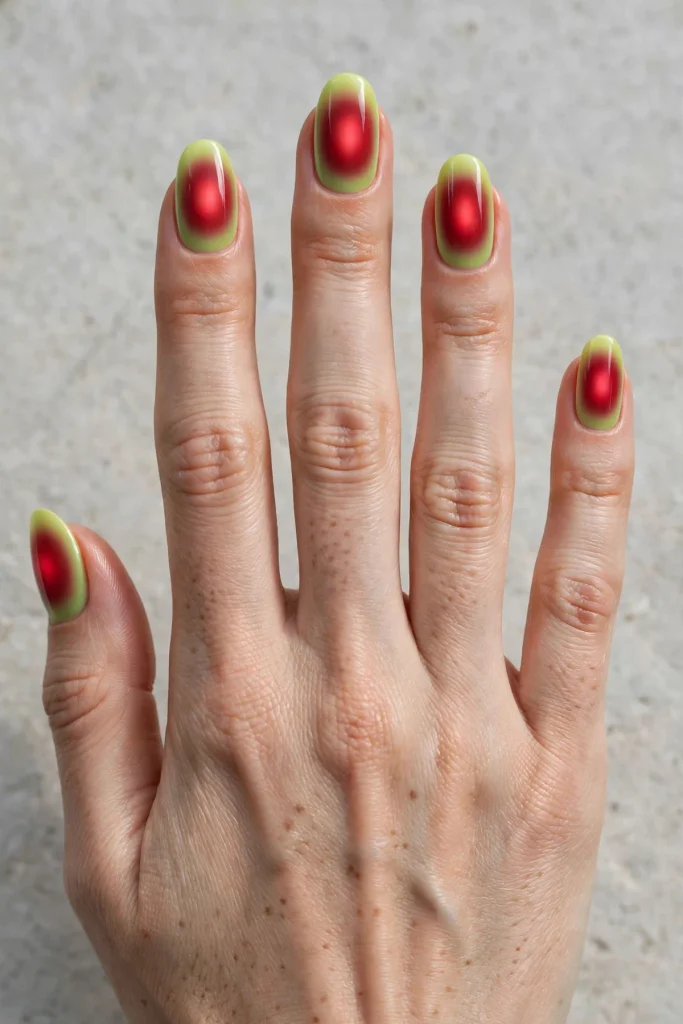
Aura nails soften this loud colour story. Each nail fades from pale lime at the edges into a deep red glow at the centre, blended with no hard line, like light through a bauble. Elegant from a distance, playful up close. It needs gel kit work, about seventy-five minutes, and blending the glow invisibly is the hardest skill here.
Aura is built, not painted: base gel and a cure, then pale lime gel. Dot deep red gel at the centre, slightly towards the cuticle, and feather the edges out with a soft brush. Cure, repeat once for depth, then top coat and a final cure.
8. Lime Stiletto Grinch Christmas Nails With Red Undersides
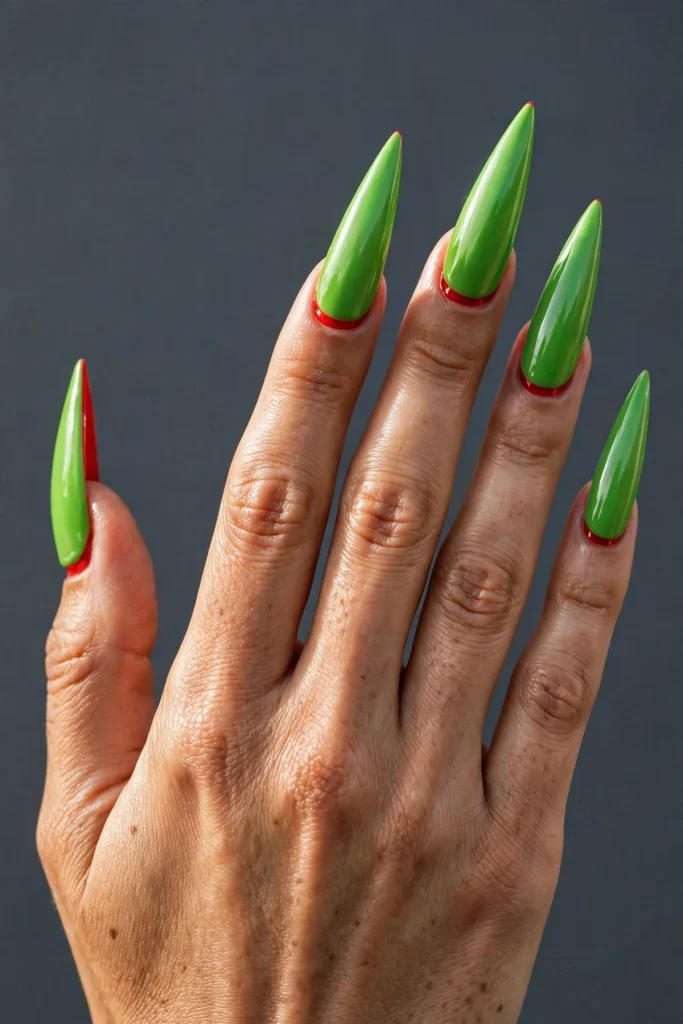
The surprise is underneath. From above, every nail is clean glossy lime on a long stiletto. Tip the hand, though, and the underside of every free edge is red, flashing whenever your hands move or wrap around a glass. Half the design hides, which is why people talk about it. About ninety minutes with shaping; the challenge is the length.
Order matters: base coat, lime over the tops in two coats, then flip your hand and paint the underside of each free edge red with a fine brush. Seal tops and undersides with top coat; bare underside paint chips first.
9. Matte Lime Grinch Christmas Nails With Raised Red Gel Drops
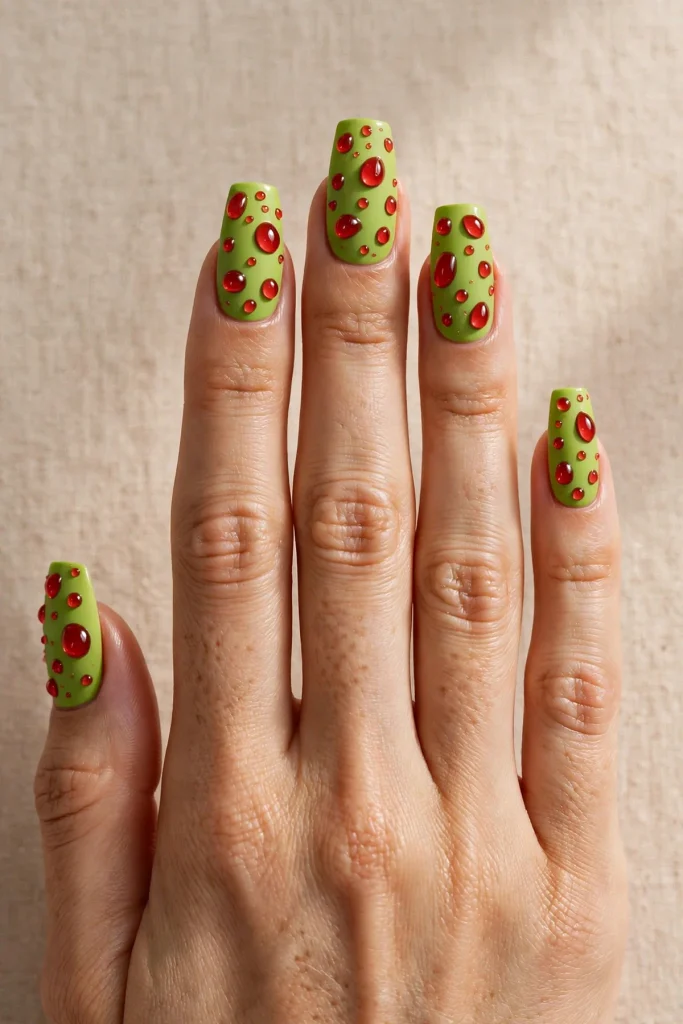
Think of dew on a lime leaf, then make it red and a little bit wicked. A matte lime base covers every nail, and raised glossy red gel droplets sit across each one at different sizes, cured into domes you can feel. A mid-length coffin gives them room. It needs gel kit work, about eighty minutes of slow, fiddly placement.
Drops go on last: base gel and matte lime, cured, with a matte top coat. Place gel droplets with a dotting tool, biggest first, flash-curing a few seconds between nails so domes hold, then a full cure. No top coat over the drops.
Halfway note: lime shows every wobble, so two thin coats beat one thick one.
10. Lime Coffin Grinch Christmas Nails With Deep Red V Tips
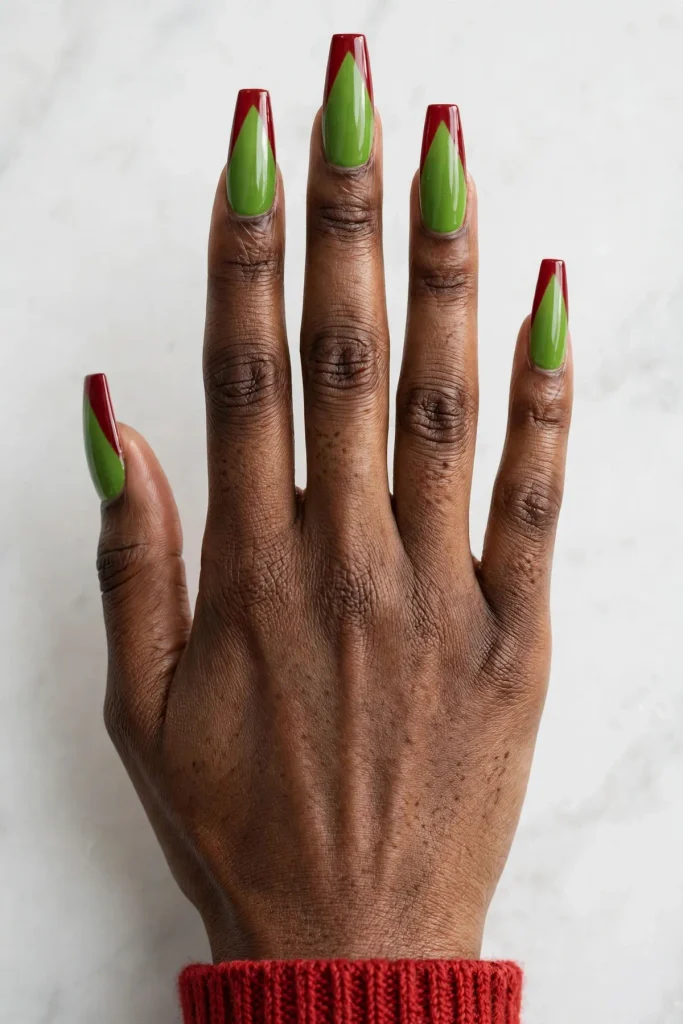
A French tip, sharpened. Every nail is glossy lime on a long coffin, and instead of a curved smile line, the tip is a deep red V whose point reaches towards the middle of the nail, lengthening its look. Confident, yet tidy. About an hour; regular polish can do it.
Mark the middle first: base coat, two coats of lime, then two diagonal red strokes from the sides of the tip, meeting at a point exactly on the centre line. A drifting point reads as a mistake. Fill the V, tidy the point, glossy top coat.
11. Lime Snakeskin Grinch Christmas Nails With a Glossy Finish

Not every Grinch set has to shout. A scale print in two close greens layers over a lime base, glossy and smooth, reads as a rich green manicure from across the room; only up close does the snakeskin show. Mid-to-long almond shows the print off. Stamped in gel, so it needs gel kit work; about seventy minutes.
The print goes on by stamp: base gel, cure, lime gel, cure again. Load a snakeskin stamping plate with deep green gel polish, stamp each nail, cure to set, then glossy gel top coat and a final cure. Keep the greens close in tone.
12. Deep Green Grinch Christmas Nails With Glossy Lime Tips
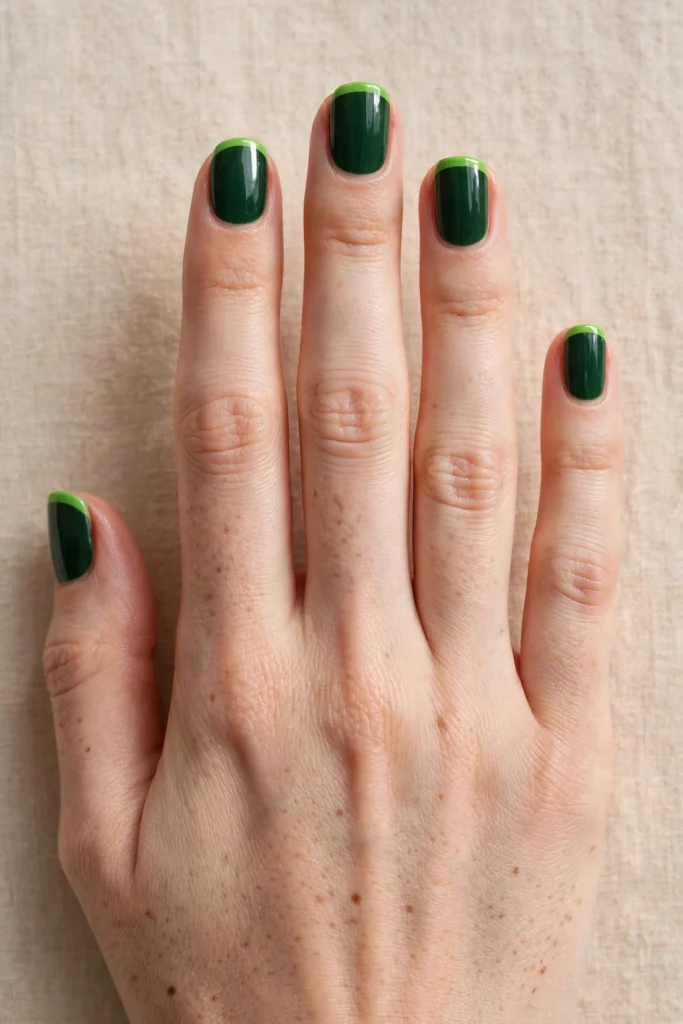
Short nails carry this pairing well. A deep forest green covers every nail, and just the tips are bright glossy lime, a clean band that catches light when your hands move. Nothing to smudge beyond the tip edge, and the dark base keeps it grown-up. Short squoval, regular polish, about thirty-five minutes.
Short nails carry strong colour better than long ones, I think. Less canvas means every bit of colour counts double.
Quick to recreate: base coat, two coats of deep green, then sweep lime across each free edge in one stroke, freehand or against a guide sticker. If tips are uneven, paint the band deeper on shorter nails. Glossy top coat.
13. Sugared Lime Grinch Christmas Nails With Glossy Red Tips
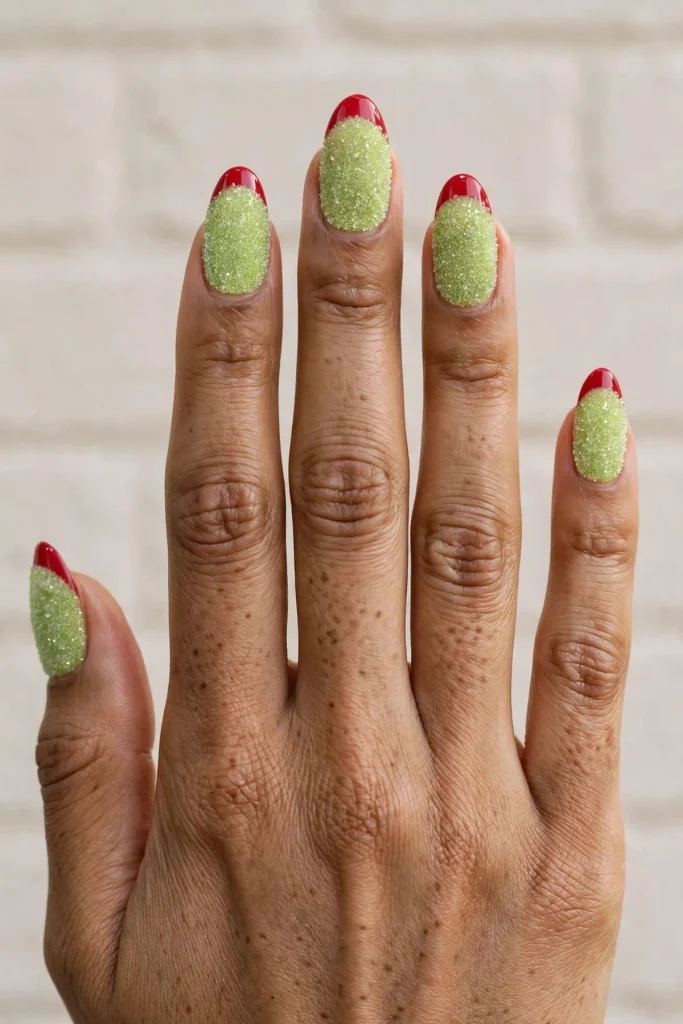
Sugar texture is the opposite of the glossy sets around it: fine lime glitter pressed over every nail to a soft frosted sparkle, like the sugared rim of a glass, and smooth glossy red tips cutting a clean line through the texture. Mid-length almond suits it. The sugar sets in gel, so it needs gel kit work; about sixty-five minutes.
Texture first, tips last: base gel and a lime gel coat, and before curing the second coat, pour fine lime glitter over the wet gel so it sticks like sugar, then cure. Brush off loose glitter, paint the red tips, cure again. No top coat over the sugar.
14. Red Grinch Christmas Nails With Lime Flame Tips

Mischief, painted. A glossy red base covers every nail, and lime flames lick up from the tips, each a different height and lean, tongues of green curling into the red. No two flames match, and the set feels alive. Mid-to-long almond or stiletto gives flames room. About seventy minutes; freehand flames forgive nothing.
Flames are drawn, not filled: base coat, two coats of red, then a fine detail brush and lime. Pull three tongues up from each tip, tall in the middle, shorter at the sides, each ending in a soft curl. Work thin; you can widen a flame, not narrow one. Glossy top coat.
15. Five Shades of Green Grinch Christmas Nails With Red-Dipped Tips
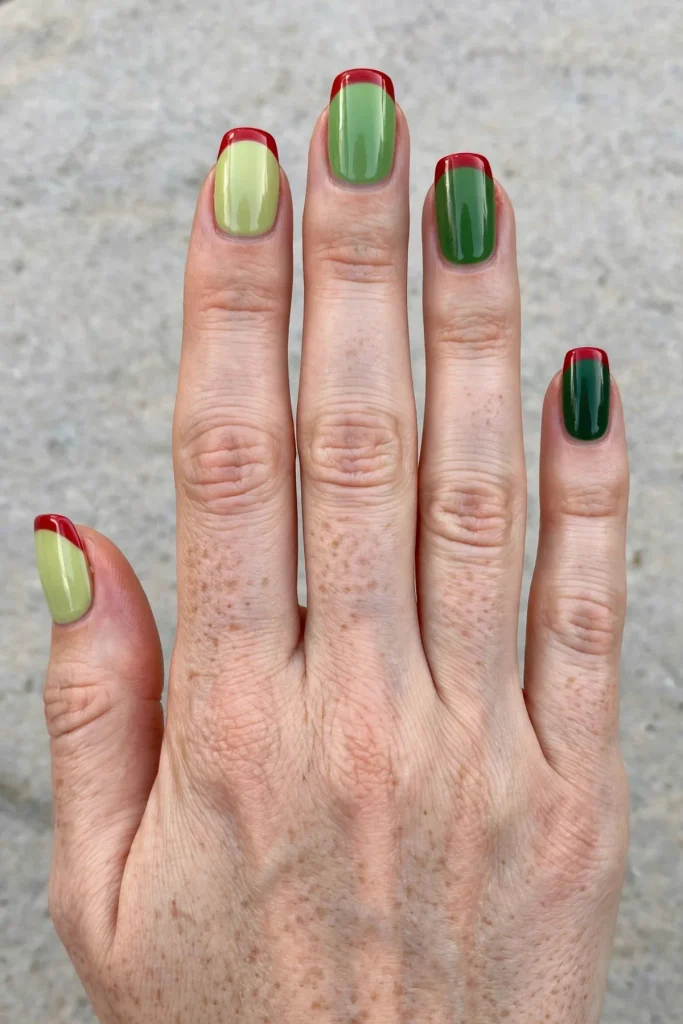
Instead of a gradient on one nail, this set runs it across the whole hand: each nail a different green, palest lime on one side to deep forest on the other, and every tip dipped in the same glossy red, tying the shades into one story. Mid-length squoval or almond keeps it neat. About fifty-five minutes.
Order is everything: line the five greens up light to dark before painting, then two coats of each shade, thumb palest to little finger deepest, or the reverse. Swapping bottles mid-set is the one way this goes wrong. Once dry, sweep the same red across every tip with a flat brush and seal with top coat.
16. Red Tip Grinch Christmas Nails With a Tiny Lime Heart
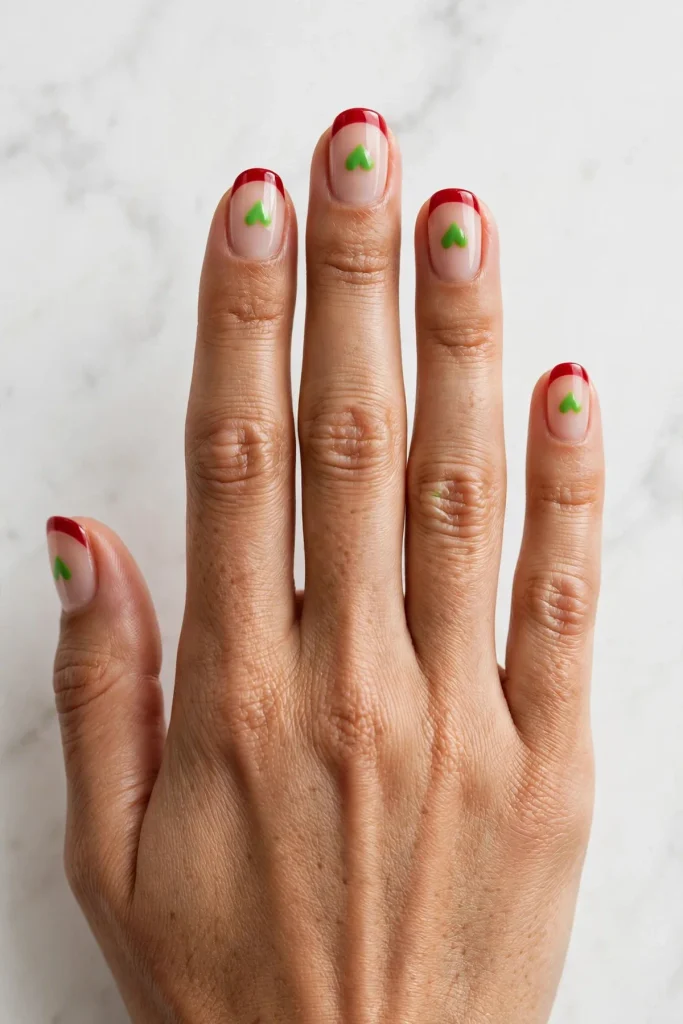
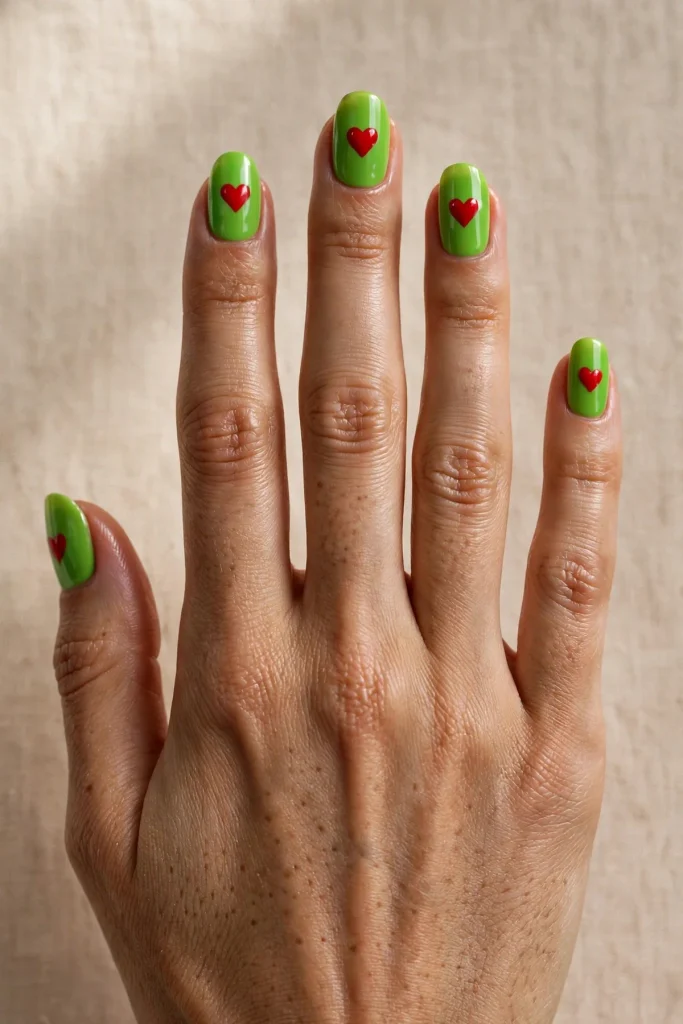
The beginner set, and the sweetest here: a sheer nude base keeps everything soft, clean glossy red tips, and one tiny lime heart in the middle of every nail, small enough to miss until someone looks closely. Each element forgives on its own. Short round nails, regular polish, about thirty minutes at home.
The gentlest method here: base coat, one sheer nude coat, red swept across each tip and left to dry. For the heart, place two tiny lime dots side by side with a toothpick and drag a point down from between them. Two dots and one drag. Top coat once dry.
17. Lime Stiletto Grinch Christmas Nails With Red Crystal Clusters
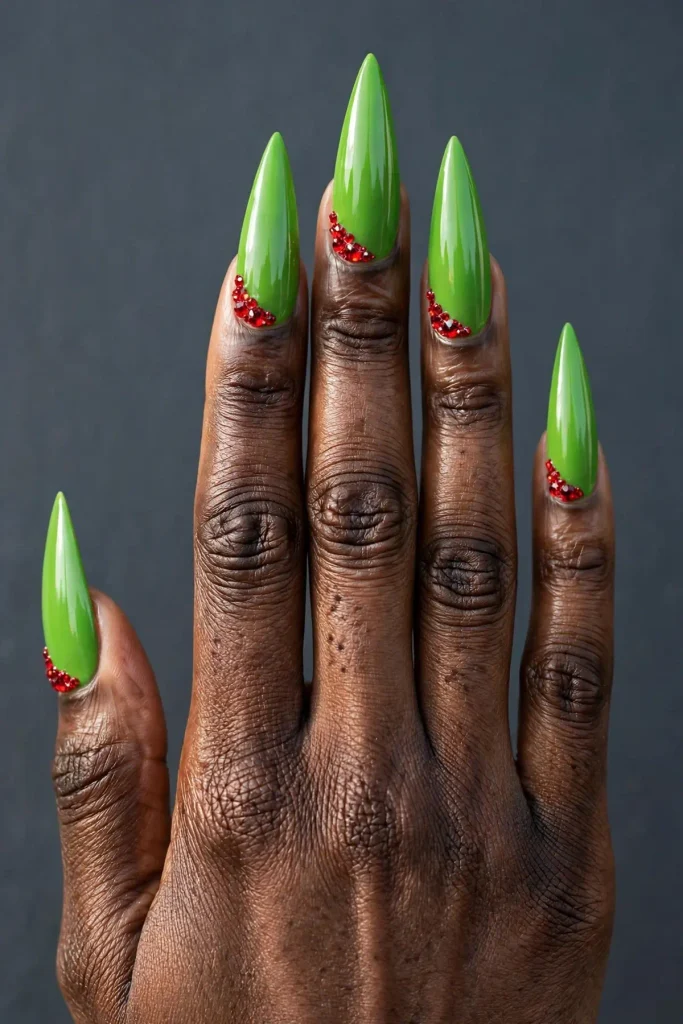
The finale set, built for parties and photographs: extra-long stilettos in clean glossy lime, and at the cuticle corner of every nail a small cluster of red crystals, placed off-centre. Jewellery and manicure in one appointment. Set in gel, so it needs gel kit work; ninety minutes or more. Save it for party week.
Jewellery rules apply: base gel and lime gel in two coats, cured. Set a dot of clear gel at the cuticle corner of each nail, place red crystals into it with tweezers, biggest stone first, cure hard to lock them. Top coat goes around the cluster, not over the stones.
How to Brief Your Nail Tech
Screenshot the exact set and say the important part out loud: the art goes on every nail, thumb included. Check the lime in daylight first: lime shades swing yellow or blue under salon lighting, and the wrong one will fight your skin tone all month. If your set is a gel one, say so when you book; jelly, aura, gel drops, snakeskin, sugared texture and crystal work all need the longer slot.
Doing Grinch Green at Home
Start with the forgiving sets: the crackle in idea 5, the wonky shapes in idea 6, the deep green tips in idea 12 and the tiny hearts in idea 16 are regular polish and honest home projects. A striping brush, a toothpick and a dotting tool stretch you to the squiggle in idea 4. Work in thin coats; lime streaks and floods cuticles when it goes on thick.
Keeping Lime and Red Looking Fresh
Start with a base coat on every set, no exceptions: lime and deep green pigments stain bare nails yellow-green, and a base coat stands between the colour and your natural nail. Seal the free edge with top coat, refreshed every few days to keep red glossy and lime bright. For gel sets, do a patch test first if your skin is reactive, and follow the kit’s curing times rather than rushing layers. Do not peel gel off when it lifts; peeling takes layers of your own nail with it. Book professional removal instead, and skip the long soaking tricks from videos, which dry nails out. Cuticle oil daily keeps both types looking freshly done.
Grinch Green That Still Looks Grown-Up
The trick is depth, not restraint. Swap bright lime for deep forest green and the set turns evening-ready, which is why idea 12 works in an office. Matte finishes calm the colour too; the matte lime sets in ideas 6 and 9 read almost like fabric. Keep the palette to two colours, one of them dark, and the theme survives on shape and contrast alone, as the snakeskin in idea 11 and the aura in idea 7 show. Loud colour on a short, neat nail reads as a choice; at extreme length it reads as a costume.
Grinch Nails Questions, Answered
What colour is Grinch green, exactly? A bright, yellow-leaning lime, lighter and sharper than emerald or forest green. If a polish looks like a highlighter with better manners, you are in the right family.
Can I do Grinch nails with regular polish? Yes, most of these sets are regular polish, including the crackle, the crooked stripes and both short-nail picks. The jelly, aura, gel drop, snakeskin, sugared and crystal sets are marked “Needs gel kit”, because those effects are built in cured layers.
Do Grinch nails work on short nails? They do, and bold colour often reads stronger on a small canvas. Ideas 12 and 16 were built for short nails, and ideas 5 and 6 suit short round and squoval shapes too.
How do I stop lime polish staining my nails? Wear a base coat under it, every time. Lime and deep green pigments are the usual staining culprits, and a base coat keeps the colour on the polish layer instead of soaking into the nail.
Can Grinch nails look grown-up enough for work? Yes, if you pick depth over brightness. The deep green tips in idea 12, the subtle snakeskin in idea 11 and the soft aura in idea 7 all keep the theme inside office territory, especially at shorter lengths.