15 Red and White Christmas Nails Design That Deserve All the Compliments
Last December I painted my nails solid red, took one look at them next to my friend’s red and white set, and quietly booked a redo. Solid red is pretty, but red and white Christmas nails have a crisp snap that a single colour does not match. Below are fifteen sets worth copying, each with the steps and an honest note on the kit it needs.
The set I return to is a milky white base with one strong red detail repeated on each nail. It photographs clean and grows out kindly.
Before You Choose: Three Checks That Save a Redo
Three quick checks before you fall for a photo and book the wrong set:
- Your red family. Blue-based reds read crisp beside white; warm reds can turn orange under party lights, so hold the bottle against something white first.
- Your length. Short nails carry the gingham (2), tweed (7) and brushstroke (10) sets with ease, while the geode (8) and ink smoke (6) need more room.
- Your kit. Ideas 3, 4, 6, 8 and 11 need a gel kit and a lamp for curing; every other set here builds happily with regular polish.
1. Candy Cane Twist Tip Christmas Nails on Milky White
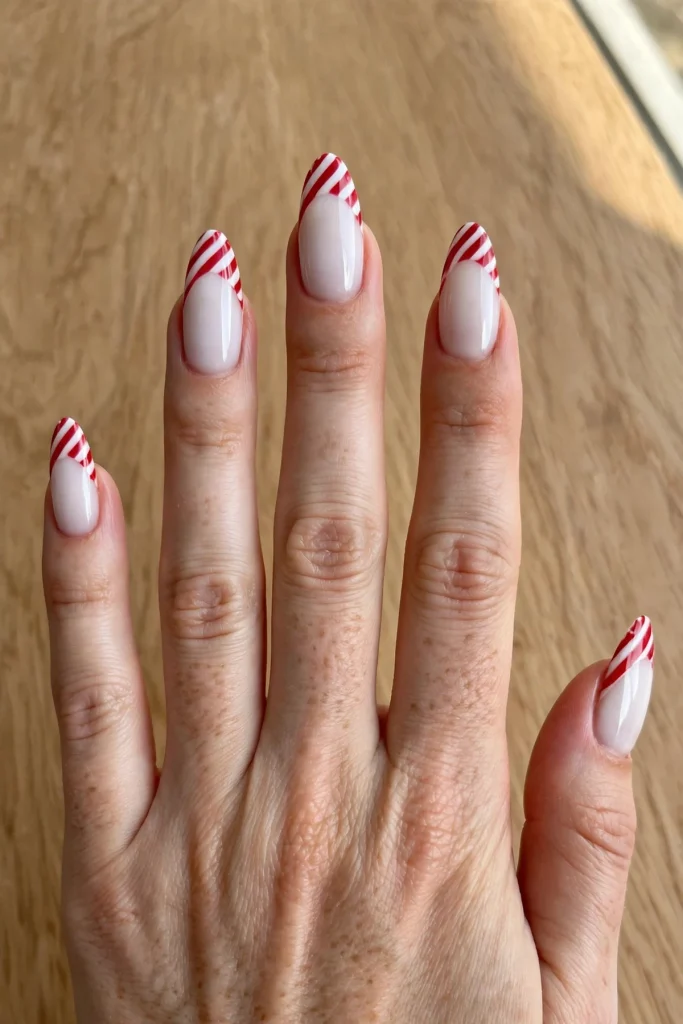
This one opens the list: it reads Christmas from across the room, yet the art sits on the tips, so it grows out gracefully. Base coat first, then two thin coats of milky white, the soft skimmed-milk kind rather than chalk. Once dry, a fine liner brush pulls red diagonal bands across each tip, each band curving slightly, like a twisted candy stick. Finish with a glossy top coat. Almond or oval nails at medium length show the twist well; allow forty minutes in a salon. Keep the bands slightly uneven on purpose; matched stripes look printed, not painted.
2. Red and White Gingham Check Christmas Nails

Gingham is the picnic-cloth pattern that suits December once the palette turns red and white. File to a short or medium square, because checks love a flat, even canvas. Base coat, two coats of white, dried fully; this design punishes rushing. With a long striping brush, paint soft red stripes one way, then across. Where the stripes cross, the colour doubles into deeper red squares, with paler pink squares between. Seal with gloss and wait ten minutes before touching anything. Tiny wobbles hide well; real cloth is rarely ruler-straight either.
3. Red Watercolor Wash Christmas Nails on Soft White
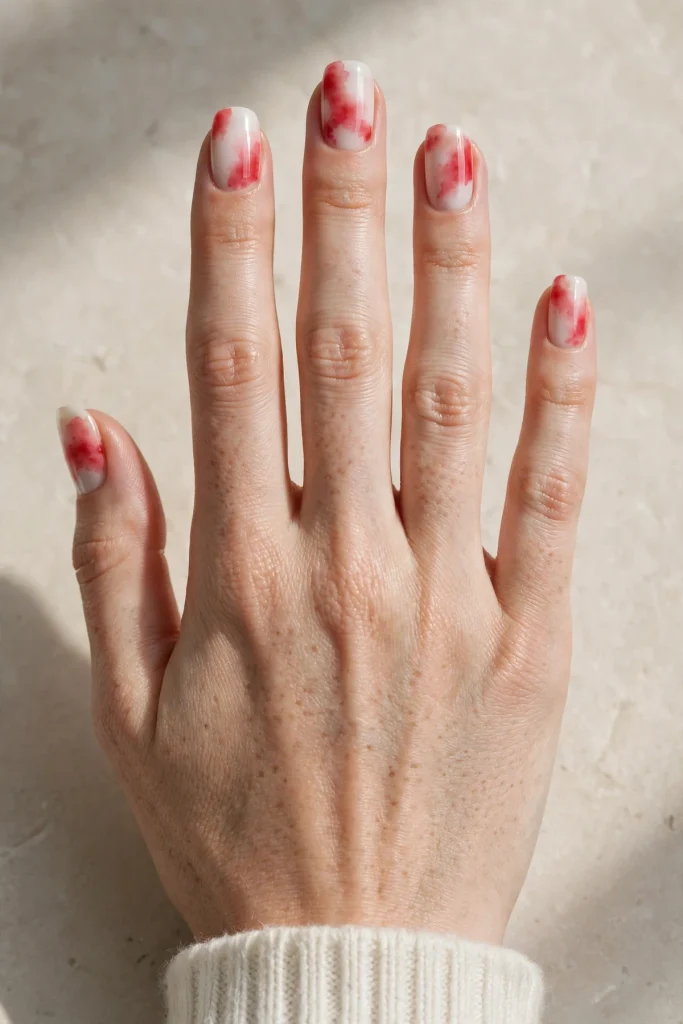
Soft and cloudy, this set blooms like paint in water. It needs a gel kit, because the wash only spreads inside an uncured blooming gel layer. Start with gel base coat and cure, then two thin coats of milky white gel, curing between coats. Paint on blooming gel and, while wet, dot red gel polish in loose clouds with a dotting tool; watch each dot feather for a few seconds, then flash-cure to hold the spread. Work nail by nail, because blooming gel waits for no one. A glossy gel top coat, cured, gives the glassy finish. Squoval nails at medium length suit the soft edges; allow a full hour at home.
4. Quilted White Christmas Nails With Tiny Red Studs
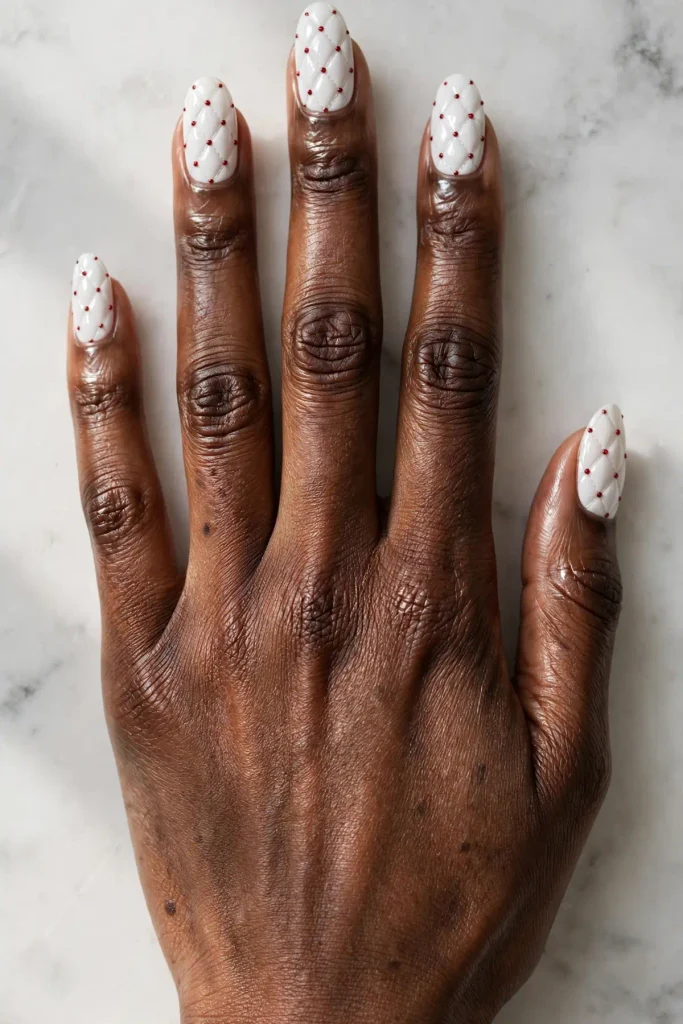
This set borrows from a quilted handbag: plump white diamonds, a tiny red stud at every crossing. It needs a gel kit, so keep the lamp close. After gel base coat and a cure, apply two coats of white gel and cure again. While fresh, draw the seams with a liner brush dipped in clear builder gel, diagonal lines both ways, and cure so they stay raised. Set one tiny red stud, a micro bead or firm dot of red gel, at each crossing, and cure once more. A glossy top coat seals the studs flat. Medium almond nails show the diamonds well.
5. Cross-Stitch Christmas Nails on a Deep Red Base

If you sew, this one will make you smile: white cross-stitch Xs marching across a deep red nail, like a sampler border. Two coats of a blue-based deep red over base coat give the ground; let them dry until hard, because any drag will show. With your finest liner brush, paint a row of tiny white Xs across the middle third, then a second row offset below, each X the same size. A magnifier helps more than a steady hand here. Finish glossy all over, or matte over the band alone for a fabric feel. Oval nails at medium length frame the band neatly.
Cross-stitch is the design I suggest when someone wants detail that reads handmade rather than printed. Take the Xs one nail at a time and it stays relaxing, not fiddly.
6. Red Ink Smoke Christmas Nails on Milky White

Red ink curling through milky water is the mood here, and it only works in gel. It needs a gel kit, since the smoke trails form inside a wet layer of clear blooming gel. Begin with gel base coat and cure, then a sheer milky white gel coat, cured. Drag one drop of red gel through a fresh layer of blooming gel with a needle-point tool, in slow S-curves; the red feathers into wisps as it travels. Flash-cure the moment a trail looks right; it keeps spreading while you watch. A second, fainter layer adds depth before the glossy top coat. A medium coffin shape gives the smoke room to travel.
7. Red and White Tweed Christmas Nails With Fine Flecks

Tweed is a texture before it is a pattern, which is why this set looks costly up close. Choose a medium square or squoval nail. Start with base coat and two coats of warm white. Once dry, drag short red strokes one way with a nearly dry flat brush, then white and paler red back across, so colours weave like cloth. Tiny cream flecks touched between strokes sell the weave. Nothing here needs to be neat; tweed that looks combed looks wrong. A matte top coat keeps it fabric-true. Give it fifteen minutes to dry before the top coat.
8. Red Geode Christmas Nails With a White Quartz Centre

A sliced geode on the nails: rings of deep red crystal around a sparkling white centre. It is a layered gel design, needing a gel kit and a lamp at every stage. Gel base coat and cure first. Paint the outer ring in your deepest red gel, cure, then a brighter ring inside it, edges wavy like real crystal bands. Fill the centre with white glitter gel, pressed dense with a flat brush, and cure. Add hair-thin white veins through the rings with a liner before the glossy top coat. Long almond nails give the rings room. Book a longer salon slot, because each ring cures on its own.
Halfway reminder: red pigment loves to stain, so base coat is doing real work in every set here. Two thin coats beat one thick coat.
9. Negative Space Arch Christmas Nails in Red and White

The grown-up end of this list starts here: bare nail showing through, framed like a little window. Each nail keeps a clear centre outlined by a slim white arch, capped with a glossy red tip and a tiny red half-moon at the base. Base coat matters doubly here, where the window shows your natural nail. Paint the red tip like a French tip, smile line deep and curved. Trace the white arch just inside the red edge with a liner brush, down both sides. Add the small half-moon at the cuticle with a dotting tool, flattened against the base. Glossy top coat pulls it together; the bare centre hides regrowth.
10. Abstract Brushstroke Christmas Nails in Red and White
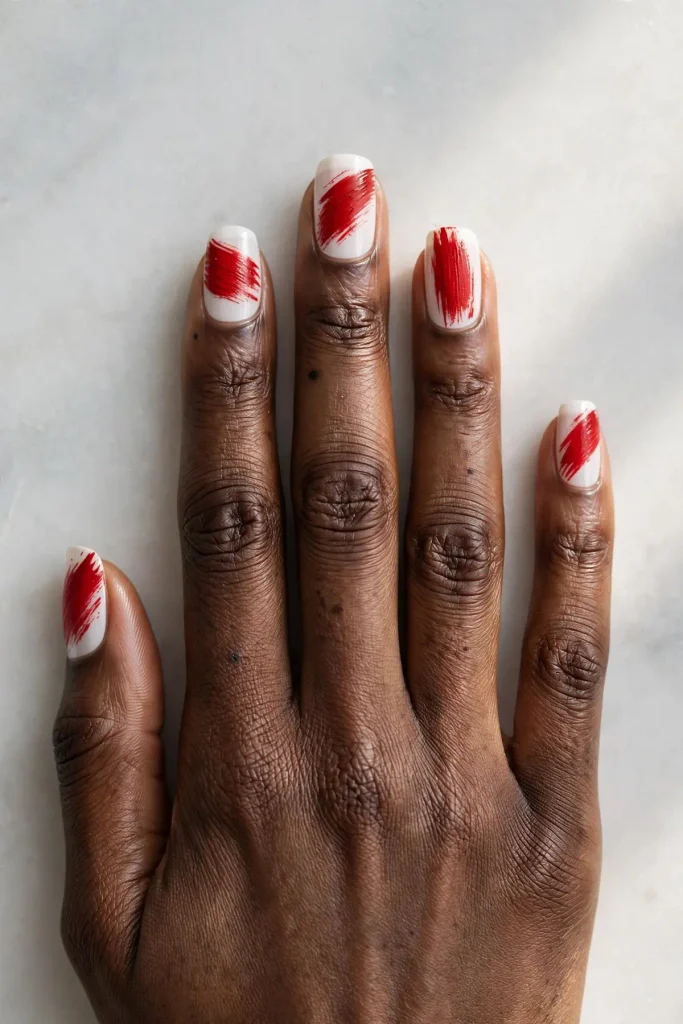
One confident red sweep across a white nail is the whole design, which is why this is the set I point beginners to. It builds with regular polish in about twenty minutes. File to a short or medium squoval, base coat, then two coats of the crispest white you own, dried hard. Load a flat brush with red, wipe most off, then pull one diagonal stroke per nail with the dry brush edge, keeping the scratchy bristle marks. Change the angle on every nail; matching strokes look stamped. Too heavy? Lift the corner with a clean brush touched with remover. Gloss top coat, done.
11. Red and White Terrazzo Christmas Nails

Terrazzo, the speckled stone of old Italian floors, is a forgiving design: the chips go wherever they land. It needs a gel kit, since the chips sit sealed under gel, smooth as glass. Gel base coat and cure, then two coats of milky white gel, cured. With a liner brush, paint irregular angular chips in deep red, bright red and a soft rose, sharp-cornered and well spaced; cure once the scatter pleases you. A few tiny white chips over the gaps balance the mix. Finish with glossy gel top coat and cure; the nail should feel like polished stone. Medium square nails echo the tile feel of the real floors.
Terrazzo is my honest pick for anyone who worries their lines are not straight. The design is meant to look scattered, so every nail comes out right.
12. White Honeycomb Christmas Nails With Red Outlines

A honeycomb drawn in red over white: graphic, neat and quietly different. Medium oval nails give the hexagons an even field. Base coat, then two coats of white, dried fully. With a fine liner brush and a red that flows well, draw one row of hexagons across the middle, sharing edges like real comb, then build rows above and below. Turn the nail, not your hand, so each line stays at a comfortable angle. Small hexagons read tidier than large ones, and a second liner pass hides any wobbly corner. A glossy top coat protects the fine work. This one asks patience rather than skill.
13. Scalloped Scale Christmas Nails in Red and White
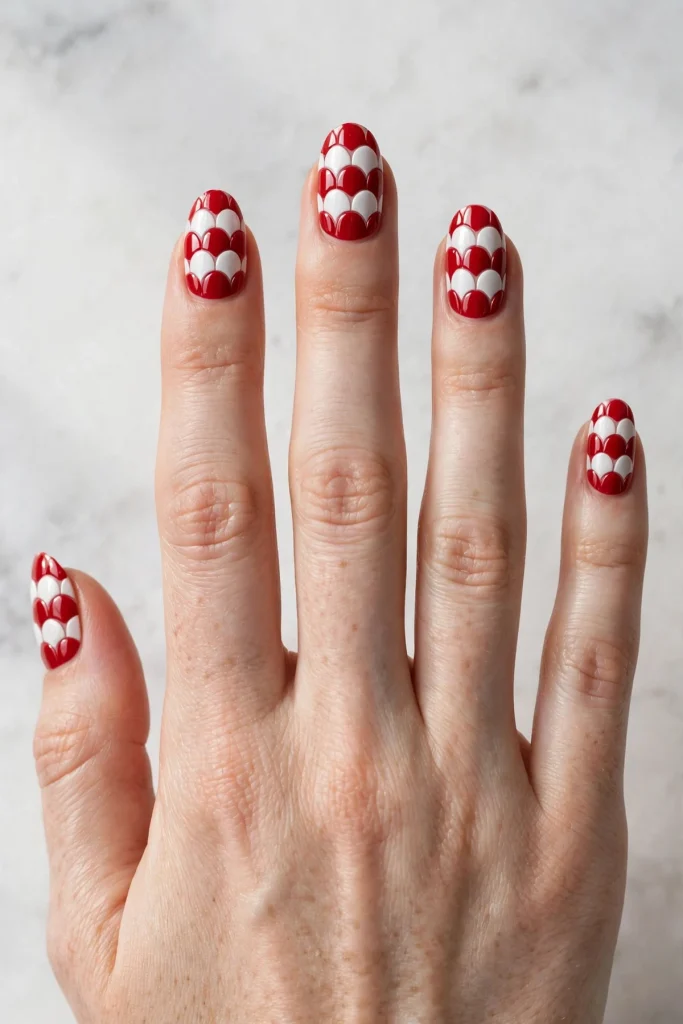
Rows of little scallops, alternating red and white, like tiles on a roof. Start with base coat and a full coat of white. Using a medium dotting tool, place touching half-circles of red along the tip edge, each dot flattening into a scallop; that is row one. Below it, a white row offset by half a dot, then red again, rows overlapping like shingles. Let each row set a minute before the next, or colours bleed into stripes. A glossy top coat melts the rows into one smooth surface. Medium almond nails show each row’s curve; shorter nails can stop at three rows.
14. Red and White Quatrefoil Tile Christmas Nails
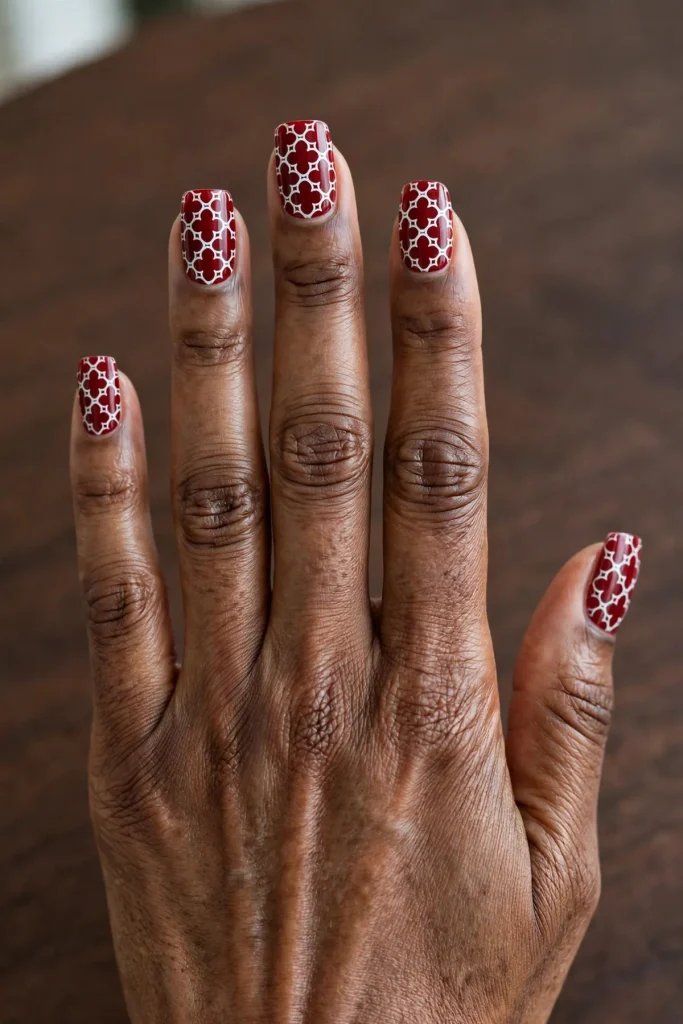
Quatrefoil, the four-petal shape in old tiles and church windows, makes a pattern that looks far harder than it is. Deep red goes down first: two coats over base coat, dried hard. The white pattern is built from circles, not petals. With a dotting tool, place four white dots in a tight square, then repeat in a grid; where dots nearly touch, quatrefoils appear in the red between. A liner brush tidies the dots into even rounds. Practise this one on a nail wheel first; spacing is everything. A glossy top coat gives the glazed-tile shine, and medium square nails hold the grid straightest.
15. Red and White Paisley Christmas Nails
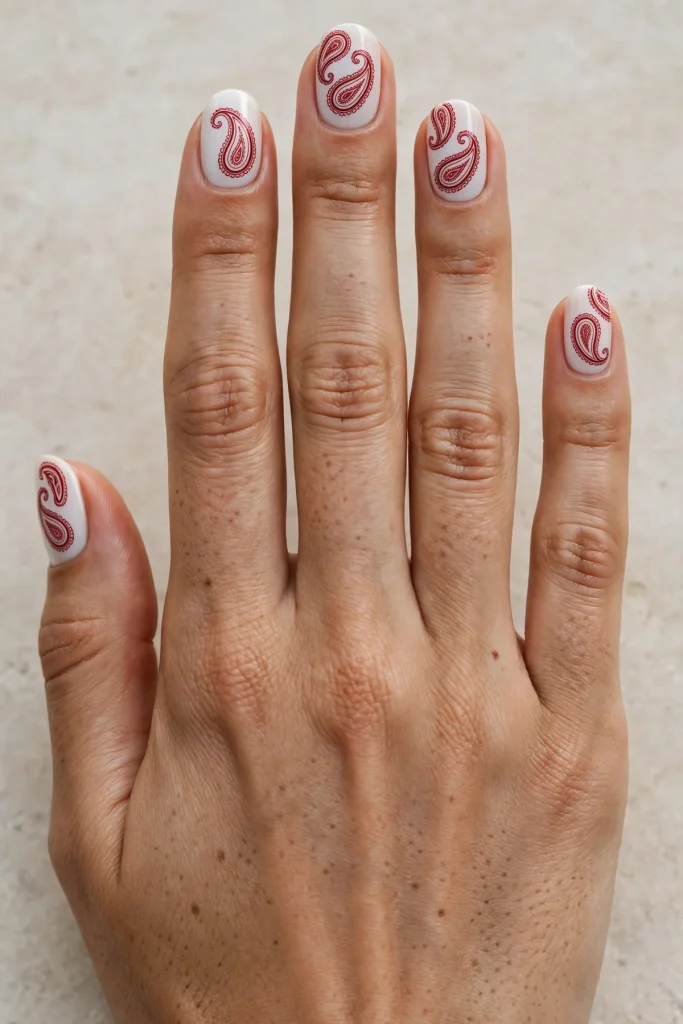
Paisley teardrops in deep red on a clean white ground: a loved scarf print, tidied up for nails. Base coat, then two coats of white. With a fine liner, draw a curved teardrop, a round drop pulled to a bent point, like a comma with ambition. Fill with red, add a smaller white teardrop inside, and one tiny red dot at its heart. One bold drop per nail, turned a different way on each nail, fills the space without crowding. The bent tip of each drop is what makes it paisley rather than a petal, so take that little flick slowly. Oval nails, medium to long, carry the curves gracefully.
Picking Your Red: Shades That Sit Well Beside White
Not every red behaves next to white. Blue-based reds (cherry, raspberry, pillar-box) read crisp against white and often flatter fair, cool-toned skin. Warm, orange-leaning reds look cheerful on golden and olive skin but can read coral beside stark white, so pair them with milky white. Deep reds like burgundy and wine make white art look rich; on deep skin they glow and the pattern does the talking. One test settles it: paint both colours on a nail stick and check the pair by a window. Clean in daylight means clean at the party.
Which Red and White Design Fits Your Length
A quick match-up before you book or sit down to paint:
| Designs | Suits | Kit |
|---|---|---|
| Gingham (2), Tweed (7), Brushstrokes (10) | Short nails | Regular polish |
| Candy Twist Tips (1), Arches (9), Scales (13) | Medium almond or oval | Regular polish |
| Cross-Stitch (5), Honeycomb (12), Quatrefoil (14), Paisley (15) | Medium, for patient painters | Regular polish |
| Watercolor (3), Ink Smoke (6) | Medium to long | Gel kit |
| Quilted (4), Geode (8), Terrazzo (11) | Medium to long | Gel kit |
Crisp, Not Candy: Keeping Red and White Grown-Up
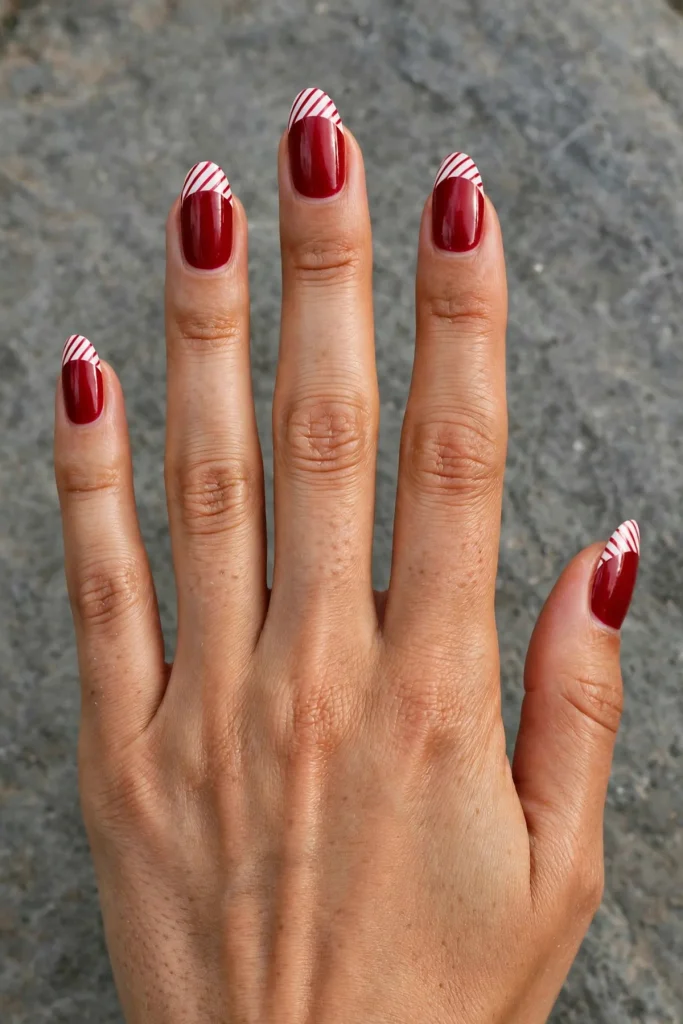
Red and white sits one step from fancy dress, so the grown-up version is mostly about restraint. Keep to one red family per set; mixing cherry, brick and burgundy across one hand reads muddled in photos. Let white do quiet work: a milky white looks calmer than a stark chalky one and flatters the red. Reach for the arches at number 9 when your outfit is loud, and save full patterns for plain clothes. One pattern across every nail, not five motifs on five nails like a sample board. One pattern, repeated, looks deliberate, and deliberate is the whole goal.
What to Tell Your Nail Tech Before the Lid Comes Off
Bring the photo, but say the base out loud first: milky white and stark white are different orders. Agree your red under a daylight lamp if the salon has one; counter lights warm every shade. For the gel sets here, numbers 3, 4, 6, 8 and 11, book the longer appointment and mention curing, so nobody is rushed at the lamp. Ask for the design on all ten nails, thumb included, and check the first finished nail before the rest continue. If a line strays mid-set, ask for the fix before the top coat goes on, not after.
Keeping a Red and White Set Looking Fresh
Care starts before colour: a base coat on every nail, every time, since red pigment stains bare nails and the marks outstay the manicure. For gel sets, patch test new products first if your skin is reactive, keep uncured gel off your skin while you paint, and cure for the full time the lamp asks. When a gel set has run its course, have it removed professionally, or file and wrap it off patiently at home; peeling gel lifts layers of your own nail with it. Skip the long soaking tricks from videos; they dry the nail and rarely speed anything up. For regular polish, fresh top coat every third day keeps white bright; gloves protect red tips at the sink.
Red and White Nail Questions, Answered Straight
Do red and white designs work on short nails? Yes; some of the strongest sets here were planned for them. Gingham (2), tweed (7) and brushstrokes (10) read clearly at short lengths because their patterns are bold rather than fine. Save the geode (8) and ink smoke (6) for longer nails.
How do I stop red polish staining my nails? Wear base coat, and do not skip it under pale designs. Two thin base coats under a deep red give the pigment nowhere to settle. Stains already there usually grow out with a gentle buff and a few weeks of pale colours.
Can I do these with regular polish, or do I need gel? Ten of the fifteen build with regular polish. Ideas 3, 4, 6, 8 and 11 need a gel kit and lamp: their effects form while gel is wet and set when it cures.
Which red suits cool skin tones? Blue-based reds usually sit happiest on cool and fair skin: cherry, raspberry and pillar-box shades. If a red turns your hands yellow-looking by a window, it leans warm; a milkier white calms the clash.
Why does my white polish go on streaky? White is the least forgiving colour. Float on two thin coats, keep plenty of polish on the brush, and leave drying patches alone. A ridge-filling base coat underneath smooths the canvas.
Red and white is the December pairing that explains itself: festive in the first photo, still polished in the last. Pick the set that matches your length, kit and patience, and let the pattern do the dressing up.