14 Aesthetic Christmas Nails for a Softer December
Honest take: the loudest nails in the room are rarely the prettiest. Aesthetic Christmas nails trade shouty glitter for fine lines, soft colour and tiny hand-painted detail, and still read festive in every photo. If your December leans calm and pretty, this is your list.

What pulled me in was how this style behaves in real light. Bold sets can look flat indoors, but a milky base with one tiny painted snowdrop catches window light from every angle. I judge a soft set by whether it makes you lean in closer.
These are the sets readers save and actually book. Fine detail photographs gently, sits happily beside knitwear and candlelight, and does not fight an outfit. Soft does not mean plain; it means every nail carries deliberate art.
Skip This If…
Three honest warnings before you book the wrong appointment:
- Skip this if you want bold, look-at-me colour. Every set here leans soft: milky bases, pale shades, one small festive anchor at a time. Love loud red-and-green contrast? These will feel too quiet.
- Skip this if you hate waiting at the salon. Fine lines take patience. The quickest set still runs about thirty-five minutes; the detailed ones pass an hour.
- Skip this if gel is not for you. Ideas 3, 4, 6, 8 and 13 need a gel kit and proper removal. The other nine work with regular polish.
Still reading? Your pick is waiting below.
1. Snowdrop Aesthetic Christmas Nails on a Milky Blush Base

Start with the set I would save first. On a sheer milky blush base, each nail carries two or three tiny snowdrops: nodding white bells on pale green stems, small enough to look embroidered. A short oval shape keeps the flowers in proportion, and gloss lets the petals catch the light. Forty-five minutes, regular polish.
To paint it, lay two thin coats of the milky blush and let them dry hard. Pull the curved green stems first with a liner brush, then tip three small white petals onto each stem’s end. Seal with a glossy top coat.
Tip: keep one nail’s snowdrops slightly higher than the rest; the uneven rhythm makes hand-painted flowers look grown, not printed.
2. Plum Blossom Aesthetic Christmas Nails With Fine-Line Branches

Fine branches do the travelling here. A dark cocoa branch sweeps diagonally across every nail, carrying three to five tiny plum blossoms in soft pink and white with dotted centres. Pale porcelain pink base, almond shape with a little length, glossy finish. About fifty minutes, regular polish.
Recreate it on two coats of porcelain pink. Thin the cocoa paint and draw one diagonal branch per nail with a liner brush. For each blossom, press five dots in a small circle with a dotting tool, pink first, one white centre dot last. Finish with gloss.
Tip: vary each nail’s branch angle slightly, so the set reads hand-drawn, not stamped.
3. Stained Glass Aesthetic Christmas Nails in Soft Jewel Tones

Jewel colour, kept quiet. Fine dark leading lines divide each nail into small panels, filled with translucent ruby, emerald, amber and sapphire jelly shades, every nail in a different layout. Almond nails with length give the panels room, and gloss makes them glow like glass held to the light. Book about seventy minutes with your most patient tech; panel work rewards a slow hand.
In the salon: a gel base cures, then the leading lines are drawn in dark gel paint and cured again. Each panel takes one jelly colour at a time, cured separately so nothing bleeds. A glossy gel top coat, cured last, finishes the glass.
Tip: keep panels small and uneven; big regular ones read like a colouring book, tiny irregular ones like real glass.
4. Dried Flower Aesthetic Christmas Nails Sealed in Milky Gel

Real flowers, sealed in milk. Tiny dried gypsophila florets sit one or two to a nail under milky white gel, like blossoms caught in frosted glass. A short squoval shape is the practical pick over texture, and the finish is a soft, cloudy gloss. About sixty minutes.
Keep the flowers tiny and flat, and milky gel turns them into jewellery for your fingertips.
The build is layered: a clear gel base cures first, then a thin milky layer goes on wet, so florets can be placed with tweezers and held with a short cure. A second milky layer floods over them, cures smooth, and a gel top coat seals it.
Tip: choose the flattest florets; bulky ones lift under gel and catch on knitwear.
5. Ribbon Candy Aesthetic Christmas Nails in Red and Cream

An old-fashioned sweet, drawn in lines. Ribbon candy is that wavy folded hard candy in red and cream; here its waves run along every nail in softened red, following the nail’s curve. Short round nails keep the rhythm neat. About forty minutes, glossy, regular polish.
Try it in this order: two coats of cream, dried well. Load a striping brush with thinned soft red and pull three loose S-curves along each nail, then deepen the folds with a second pass. A glossy top coat softens the lines together, like real candy.
Tip: let the waves sit at different heights on each nail; real candy folds refuse to match, and the set is sweeter for it.
6. Mother-of-Pearl Aesthetic Christmas Nails With Shell Flakes

Think of light on water, scaled down. Crushed mother-of-pearl flakes scatter across a sheer pink base, no two nails alike, sealed under a smooth glossy layer. Oval nails at a mid length show them at their prettiest, the curve catching the iridescence as your hand moves. About fifty-five minutes.
A sheer pink gel base cures first. Flakes press onto the tacky surface with a silicone tool, one nail at a time, then clear gel floods over them and cures until level. A gel top coat finishes it.
Tip: cluster flakes near the tip, fewer at the base; the gradient keeps the pink showing and stops them looking like confetti.
7. Camellia Aesthetic Christmas Nails on a Pale Cream Base

Camellias bloom in the cold months, which makes them December flowers. Each nail holds one or two soft blooms in blush pink and white, petals deeper at the edge, paler in the centre, with two fine sage leaves beside them. The base is pale cream, the shape a short almond, the finish glossy. About fifty minutes of regular polish work.
Paint it petal by petal over two coats of cream. With a small round brush, lay the outer petals in deeper blush, the inner ones paler, and finish each bloom with a tiny white highlight. The sage leaves come last, from a liner brush.
Tip: give one nail a single bloom and the others two; the odd one out keeps the set arranged, not repeated.
Halfway note: photograph fine-line sets in soft daylight near a window. Flash flattens tiny detail; grey winter light shows every stroke honestly.
8. White Ermine Aesthetic Christmas Nails in Fine Detail

The smallest winter animal carries this set. On a pale grey-blue base, a tiny white ermine curves along every nail, black only at its tail tip and eye dots, painted small enough to stay delicate. Short oval nails keep it in proportion, under a soft matte top coat. Book about sixty-five minutes when the salon is quiet; tiny painted features punish rushing.
The grey-blue base cures first; the ermine’s body goes on as one white curved stroke, refined with a detail brush, curing between stages so lines stay crisp. Whiskers and eye dots come last, then a matte gel top coat cures over all.
Tip: resist scaling the ermine up; thumbnail size reads sweet, larger reads costume.
9. Pussy Willow Aesthetic Christmas Nails With Silver Buds

Silver buds on fine stems are the whole design here, and honestly it is enough. Slim brown-grey stems rise along every nail, dotted with tiny velvety buds in soft silver, over a pale stone base. Short squoval nails suit it, the finish low satin. About thirty-five minutes with regular polish; forgiving enough for a first try at home.
At home it goes like this: two coats of pale stone base. A liner brush pulls one slim stem up each nail’s centre. Then a makeup sponge’s corner dabs on the buds in silver-grey, smallest near the tip. A satin top coat keeps them velvety.
Tip: if a bud lands too big, soften its edge with a dry sponge corner; fuzzy edges are the point of willow.
10. Birch Bark Aesthetic Christmas Nails in Soft White and Grey

Birch bark is winter texture at its quietest. A soft white base carries fine horizontal markings in grey-brown, short dark dashes and the odd longer stroke, spaced differently on every nail so nothing looks printed. Squoval nails with a little length give the markings room, and matte makes it read as bark, not nail art. About forty minutes of regular polish; the loose spacing hides a wobble kindly.
White space is an ingredient, not an absence; birch reads as birch only while the markings stay sparse.
Recreate the bark on two coats of soft white. A liner brush lays the longer horizontal strokes first, in thinned grey-brown; short dark dashes go on second, spaced unevenly on purpose. Matte top coat over everything does the bark impression for you.
Tip: if a nail looks busy, you added one dash too many; stop a stroke earlier than feels finished.
11. Pomegranate Aesthetic Christmas Nails With Ruby Seed Detail
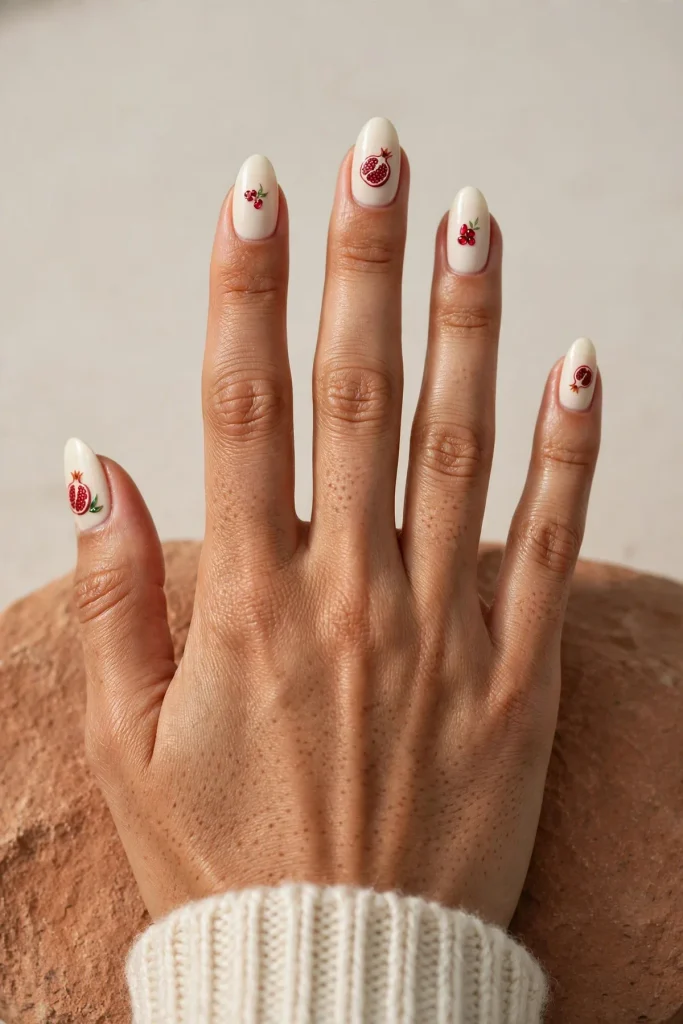
A cut pomegranate is basically jewellery that grows on a tree. On a deep cream base, every nail carries a small halved fruit with jewel-red seeds dotted inside, or a tight seed cluster with one fine leaf, so the set stays balanced. Almond nails, glossy, regular polish, about fifty-five minutes.
To build the fruit, start with two coats of deep cream. A small brush paints the halved-fruit shape in muted red, and a toothpick tip dots in the seeds, jewel red, one by one. One liner-brush leaf per nail, then glossy top coat.
Tip: dot two or three seeds in paler red among the deep ones; the mix makes them glint like cut stones.
12. Sugared Violet Aesthetic Christmas Nails With a Frosted Sparkle

Sugared flowers decorate winter cakes, and they scale down beautifully. Tiny violet petals in soft purple cluster on every nail over a pale lilac-cream base, with a fine frosted sparkle dusted over the petals only, like sugar on a cake decoration. Short oval nails, satin finish, regular polish. About forty-five minutes; the clusters go on freehand, so no two nails need to match.
It goes on in passes: two coats of lilac-cream base first. Each flower is five dotting-tool dots in soft purple with one darker centre dot. Once dry, brush a fine-glitter top coat over the petals only, then plain satin top coat across the whole nail.
Tip: keep clusters to one side of each nail; off-centre flowers look hand-arranged, not stencilled.
13. Ice Fern Aesthetic Christmas Nails on a Pale Blue Jelly Base

Frost grows in ferns, and here the pattern climbs from the corner of each nail. Feathery white ice ferns branch upward over a pale blue jelly base, one main stem with shorter strokes angled off it, every nail a slightly different crystal. A longer almond suits the sweep, finished glossy so the blue glows through. About sixty minutes; treat this as a salon set, not a kitchen-table project.
Drawn near the end: over the cured pale blue jelly base, a liner brush pulls one white gel-paint stem from each nail’s corner, then the shorter strokes, with a brief cure between nails. A glossy gel top coat, cured, sets the shine.
Tip: angle every fern toward the same corner; a set growing one way looks like one frost, not five accidents.
14. Winter Wren Aesthetic Christmas Nails on a Soft Taupe Base
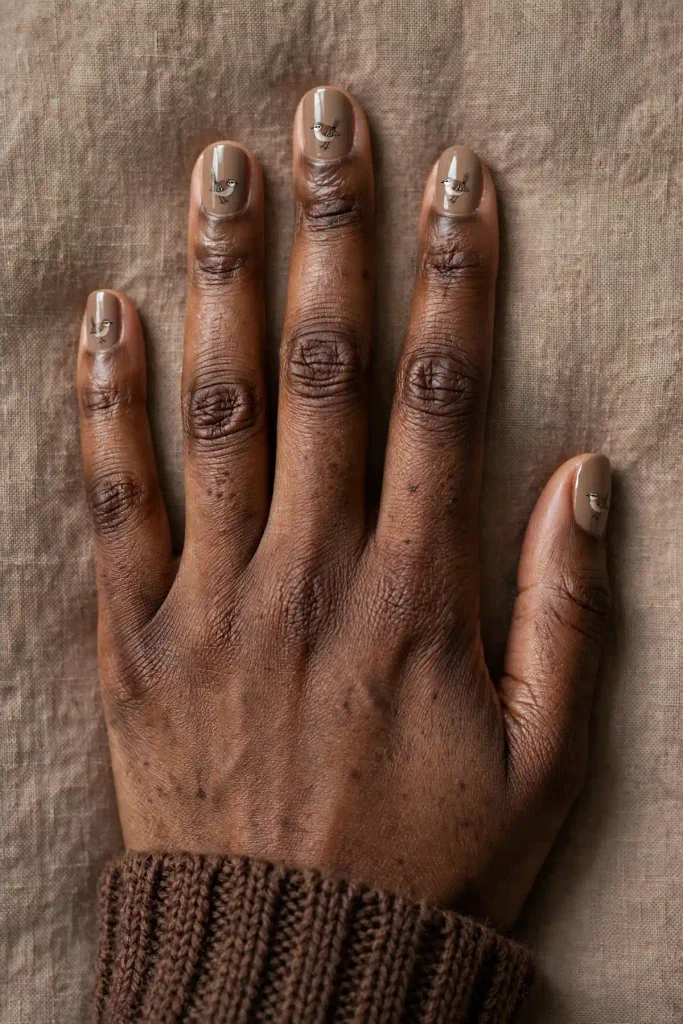
End on the roundest little bird of winter. A tiny brown wren sits on every nail, tail cocked, pale belly, fine wing marks, over a warm taupe base that flatters deeper skin tones as kindly as fair ones. Short round nails echo its shape; glossy finish, regular polish, about fifty-five minutes.
Paint the bird in layers over two coats of taupe. The body is one rounded teardrop of mid brown from a small brush, the belly a pale sweep beneath it, the tail one short upward stroke. Wing marks and eye dot come last with a liner brush; gloss seals it once dry.
Tip: keep the wren facing the same way on every nail; a row of birds looking one way reads as a flock.
Soft Palettes at a Glance
Like a design but not its colours? Borrow a palette below. Each keeps one festive anchor in miniature, stopping soft shades drifting into spring.
| Soft palette | Shades in it | Festive anchor | Flatters most in |
|---|---|---|---|
| Milky Blush | Blush pink, cream, pearl white | Deep red, used tiny | Fair to medium skin, candlelight |
| Pale Winter Blue | Powder blue, grey-blue, silver | Fine white detail | Cool undertones, grey daylight |
| Cream and Gold | Warm cream, champagne, pale gold | Jewel-red seeds or panels | Warm undertones, evening light |
| Soft Berry | Lilac cream, violet, dusty plum | Frosted sparkle | Deeper skin tones, party lighting |
What to Show Your Nail Tech
Bring a photo of the exact set, not a mood board of ten. Fine-line work lives or dies on reference; one clear picture settles scale, colours and placement in seconds.
Name the base colour first, then the motif, then say the words every nail. Techs default to one feature nail when time runs short, so settle it before the first coat. If your pick needs gel, say so at booking; rushed fine lines show it.
Looking After Fine Detail
Delicate art is only as strong as what sits under it. Start every set with a clean base coat; it grips the colour and stops soft shades staining your natural nail.
If you wear gel at home, patch test first: a small amount cured on one nail, worn for a day, tells you whether your skin is happy before a full set. When gel comes off, have it removed professionally. Peeling it away lifts fine layers of your own nail with it, and the long soaking tricks in videos dry nails and skin badly. Professional removal is quicker and kinder.
For regular polish, refresh a thin top coat every few days; gloves for washing up save more manicures than any product.
The Quiet Palette Rule: Soft Colours That Still Read Christmas
Here is the rule I keep coming back to: a soft set reads festive when one small thing on it is unmistakably December. A cluster of ruby seeds. A branch of plum blossom against the cold. Panels of jewel colour, kept translucent and tiny.
Contrast does the work that volume does in louder sets. Milky bases make one deep shade richer, and fine lines slow the eye down, which is why these sets photograph well and grow out politely.
Pick your anchor first, then build the quiet around it. If everything whispers, nothing carries; one clear note is enough.
Questions Readers Ask About Aesthetic Christmas Nails
Can aesthetic Christmas nails be done with regular polish? Yes. Nine of the fourteen sets here are regular polish from start to finish. The five gel sets are ideas 3, 4, 6, 8 and 13, where jelly colour, dried flowers or shell flakes need curing to sit flat.
How long does fine-line nail art take at a salon? Most sets run between thirty-five and seventy-five minutes. Stem and bud work sits at the fast end; stained glass and the ermine at the slow end, since every line is painted and cured in stages.
Do soft colours still look festive in photos? Yes, as long as one detail carries the season. A tiny ruby seed cluster or a jewel-toned panel reads clearly as Christmas against a milky base, and soft shades flatter hands in winter light.
Which of these designs suit very short nails? Ideas 5, 9 and 12 were built short: ribbon candy waves, pussy willow buds and sugared violets stay in proportion on short round and squoval nails.
How do I make delicate nail art last through the season? Seal it with top coat and refresh it every few days. Wear gloves for washing up, open things with your finger pads, not your nail tips, and keep nails out of tool duty.
The Soft Version
Soft is not the safe option; it is the confident one. Pick the set whose tiny detail you would enjoy on your own hands, book the time it honestly needs, and let December do the rest.